


Table of Contents
1 Introduction to website building
In today’s digital world, building an online store is no longer just a luxury for your business. It is your ultimate passport to freedom and scaling your hustle. Traditional storefronts are facing more competition than ever, and moving your vision online is the most powerful way to break through geographical boundaries. An ecommerce site allows you to keep your doors open twenty-four hours a day, seven days a week, serving customers anywhere in the world while maximizing your true sales potential.
A truly successful online store is far more than just a beautiful digital window. It is a complete ecosystem where your product listings, a smooth shopping cart, secure payment gateways, and excellent customer support all flow together. When these elements click, you create an unforgettable experience that turns casual visitors into deeply loyal customers. Best of all, owning your platform gives you direct access to invaluable data about what your audience loves, allowing you to tailor your marketing and grow your business with absolute precision.
If you are a beginner, looking at the massive world of web design can feel completely overwhelming. The sheer volume of platforms, tools, and tech jargon is enough to make anyone stall out. You have probably heard of options like Wix, Squarespace, or Weebly, and while they all have their place, there is one legendary combination that stands completely in a league of its own: WordPress paired with WooCommerce.
WordPress gives you total, unrestricted freedom to customize your site exactly the way you want, without any corporate platform locking you into their rules. By adding the WooCommerce plugin, you instantly transform that flexibility into a retail powerhouse. This combination gives you a clean, intuitive dashboard that simplifies the entire building process while giving you the heavy-duty features you need to scale from your very first sale to an international brand.
Choosing WordPress and WooCommerce means you are taking full ownership of your digital asset. It lowers your learning curve dramatically so you can stop stressing over complicated code and start focusing on the creative, strategic growth of your business.
So, what are you waiting for? If you have been procrastinating or holding back because you are worried about the technical steps, I have you completely covered. In this comprehensive guide, I am going to walk you through every single step to build your first website from scratch, ensuring you can launch a stunning, professional online store with ease and confidence. Let’s build your legacy together.
2 The Foundations of your Online Store (Hosting & Setup)
What do you need to build a WooCommerce website?
Embarking on the journey to build your very first online store is an incredible milestone, and getting your foundation right is the absolute secret to long-term scalability. Before you touch a single line of code, you need to secure the raw, essential ingredients that keep your website alive and visible to the world. Think of these elements as the digital real estate, the structure, and the security system of your future storefront.
To launch an e-commerce store with WordPress and WooCommerce, you need four non-negotiable components: a domain name, a reliable web hosting provider, a WordPress installation, and an SSL certificate.
Your Digital Address: The Domain Name
A domain name is your unique address on the internet. It is the exact sequence of letters that people type into their browser search bar to find your business, such as: www.yourbusinessname.com . It serves as the primary point of contact for your audience and forms the baseline of your entire brand identity.
Choosing a domain name requires deliberate, strategic thought. You want to select something short, highly memorable, and reflective of your industry. If you find yourself struggling to nail down the perfect title, I highly recommend checking out my comprehensive guide on How to Choose a Brand Name That Commands Authority. Remember, choosing the right name is the first step when you start your own business, and it sets the tone for everything else you build. Consistency across your domain name enhances your immediate credibility and makes it effortless for your dream customers to find you online.
Your Digital Engine: Web Hosting
If your domain name is your home address, web hosting is the actual physical house that stores your website files, images, code, and databases, making them accessible to the global internet twenty-four hours a day. While beginners often start with basic shared hosting due to its extreme affordability, running a heavy e-commerce store demands an engine that offers reliable speed, tight security, and smooth scalability to accommodate your traffic spikes.
When you evaluate hosting companies, you must prioritize uptime reliability, server processing speed, automated security protocols, and responsive human customer support. A slow host will actively destroy your sales conversion rates, so investing in a platform optimized specifically for WordPress and WooCommerce environments is vital. Furthermore, search for hosting plans that allow easy scalability to avoid future migration hassles.
Your Digital Guard: The SSL Certificate
An SSL (Secure Sockets Layer) certificate is an absolute requirement for modern retail. It is the security technology that encrypts the data flowing between your customer’s browser and your server, protecting sensitive credit card information, passwords, and personal details from hackers.
When an SSL certificate is active, it displays a secure padlock icon next to your URL in the browser bar. Without this baseline security layer, search engines will flag your site as unsafe, and customers will instantly leave your page before making a purchase.
Why I have chosen Hostinger as my hosting company of choice?
When it comes to establishing an efficient, blazing-fast e-commerce website, selecting your partner is a make-or-break decision. Speaking directly from my personal journey, I highly recommend and rely on Hostinger. In fact, I personally use Hostinger to power my active online retail brand, GODEHS, alongside this very blog, Hustle Oasis. My specific business plan allows me to run up to 100 individual websites under one dashboard, providing a level of freedom and consolidation that is perfect for any scaling entrepreneur.
Hostinger has earned its reputation as a global leader for millions of business owners because they have specifically engineered their platform to cater to modern e-commerce requirements. They blend premium, high-tier performance with unmatched affordability, which is an absolute lifesaver for startups working within tightly constrained budgets.
One of the most exceptional benefits of choosing Hostinger is their server environment, which is highly optimized using LiteSpeed server technology designed specifically for WordPress and WooCommerce. This ensures your store pages load rapidly even during pick traffic, keeping your bounce rates low and your customer satisfaction high.
Furthermore, Hostinger completely streamlines your operational safety by handling automated daily or weekly website backups, automatic core software updates, and advanced vulnerability scanning to protect your store from malware. If you ever hit a technical roadblock in the middle of the night, their expert live chat support team is available twenty-four hours a day, seven days a week to help you troubleshoot and resolve any issue in real-time.
With a rock-solid 99.9% uptime guarantee, cloud-powered infrastructure, a free domain for your first year, and an incredibly intuitive custom control panel (hPanel), Hostinger removes all the friction of launching your digital storefront so you can focus entirely on your revenue and growth.
Is WooCommerce entirely free to use?
The short answer is yes, the core WooCommerce plugin is 100% free and open-source. This is why it is celebrated globally as one of the most accessible, cost-effective ways to escape corporate ecosystem fees and take full ownership of your business.
However, I want to give you a transparent look at the real-world costs of building a functional website so you face zero surprises along the way. While the software itself costs nothing, the surrounding infrastructure requires a small baseline financial investment.
To help you budget with absolute confidence, I have mapped out a realistic, professional price estimation based on the exact high-performing tools we are using in this guide:
The Real-World Launch Budget
| Expense Item | My Recommended Stack (Hustle Oasis) | Renowned Hosting & Theme Alternatives | Alternative SaaS Platforms (Shopify / Wix) |
| Core Software | WordPress + WooCommerce 💰 Cost: $0.00 (Free) | WordPress + WooCommerce 💰 Cost: $0.00 (Free) | Shopify Basic or Wix Business 💰 Cost: $29.00 – $39.00 / month |
| Web Hosting | Hostinger WordPress Premium 💰 Cost: ~$2.99 / month | SiteGround or Bluehost 💰 Cost: ~$4.99 – $7.99 / month | Included in SaaS Subscription 💰 Cost: $0.00 (Built-in) |
| Domain Name | Hostinger Registry 💰 Cost: $0.00 (Free for year one) | Namecheap or GoDaddy 💰 Cost: ~$10.00 – $15.00 / year | SaaS Domain Registry 💰 Cost: ~$14.00 – $20.00 / year |
| SSL Security | Hostinger Lifetime SSL 💰 Cost: $0.00 (Free) | Let’s Encrypt / Cloudflare 💰 Cost: $0.00 (Free) | Included in SaaS Subscription 💰 Cost: $0.00 (Built-in) |
| Premium Theme | Flatsome WooCommerce Theme 💰 Cost: ~$59.00 (One-time fee) | Astra Pro or Divi Theme 💰 Cost: ~$49.00 – $89.00 / year | Premium Shopify Theme 💰 Cost: ~$180.00 – $360.00 (One-time) |
| Transaction Fees | 0% Platform Fees (Only standard payment processor) | 0% Platform Fees (Only standard payment processor) | 2% Additional Fee (If not using their native gateway) |
| First-Year Total | ~$95.00 Total | ~$120.00 – $200.00 Total | ~$530.00 – $830.00 Total |
When you contrast this total investment against platforms like Shopify, which lock you into high recurring monthly subscriptions, transaction fees on every sale, and restrictive app costs. WooCommerce remains the undisputed champion for lean, profitable growth. Furthermore, remember that expenses like hosting and domain registrations are necessary to build any website on the internet, not just an e-commerce store.
Best of all, because WooCommerce has a massive, vibrant global community, you have access to a wealth of free tutorials, plugins, and community forums to solve any future problem without ever paying expensive developer fees.
Take a deep breath and look at those numbers. Building a professional, globally accessible digital asset for under one hundred dollars is the ultimate competitive advantage of the modern digital economy. The tools are ready, the pricing is transparent, and your vision is waiting.
Let’s step past the preparation phase and get into the real work. It is time to start creating.
3 Building the Architecture of Your Store
How to Set Up Your Domain and Hosting with Hostinger?
Setting up your e-commerce website begins with securing a powerful domain name and a reliable web hosting engine. I personally use and recommend Hostinger because their platform is built to make this process incredibly intuitive for entrepreneurs. While I will be walking you through this guide using Hostinger as our exact model, you are completely free to apply these foundational steps to whatever hosting provider you choose to work with.
To get started on your path, your first step is to visit the official Hostinger platform and create your account.

Once you are logged into your new dashboard, click on the ‘Get Started’ button to view their available hosting packages. You will notice that their pricing structures vary depending on the length of the subscription period you choose at checkout. If you are just testing the waters and want a lower upfront commitment, selecting the twelve-month plan is a smart starting point. However, if you are fully committed to your business vision and want to lock in the absolute highest long-term savings, choosing the forty-eight-month tier is the ultimate executive move.
the Unlimited plan is highly recommended because of the unlimited websites and mailboxes, the included CDN, and the Priority 24/7 expert support that comes in handy in case of rising problems. If you’re on a tight budget start with a Premium plan, you will always have the option to upgrade in the future.
When evaluating the specific packages, the Business or Cloud tiers are highly recommended. These plans gift you with the ability to host multiple websites, create unlimited custom business mailboxes, utilize a built-in global Content Delivery Network (CDN) to make your pages load instantly worldwide, and grant you priority twenty-four-seven expert support which becomes an absolute lifesaver if you ever hit an unexpected roadblock. If you are working with a tight budget, you can easily start with their entry-level Premium plan, knowing you always have the freedom to upgrade your resources with a single click as your store scales.
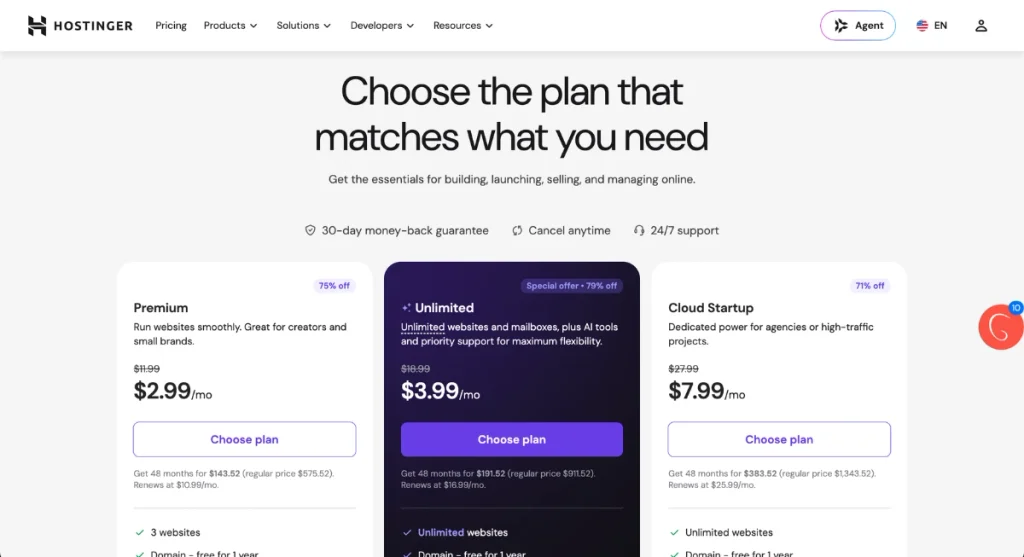
Once you select the perfect tier for your goals, simply fill in your registration details and complete the checkout process. For digital-first entrepreneurs, Hostinger also offers the flexibility to pay securely using major cryptocurrencies. As soon as your payment is successfully processed, your brand-new hosting package will appear inside your central hPanel dashboard as a pending setup order.
Think of this hPanel area as your central command center. It is a clean, modern interface where you will manage every single component of your domains, security, and backend files. You can kick off your setup wizard smoothly by navigating to the Websites tab and clicking the setup option right next to your pending order.
The onboarding system will instantly ask you a fundamental question: do you want to create a brand-new website from scratch, or migrate an existing store over to their servers? Go ahead and select the option to create a completely new website.
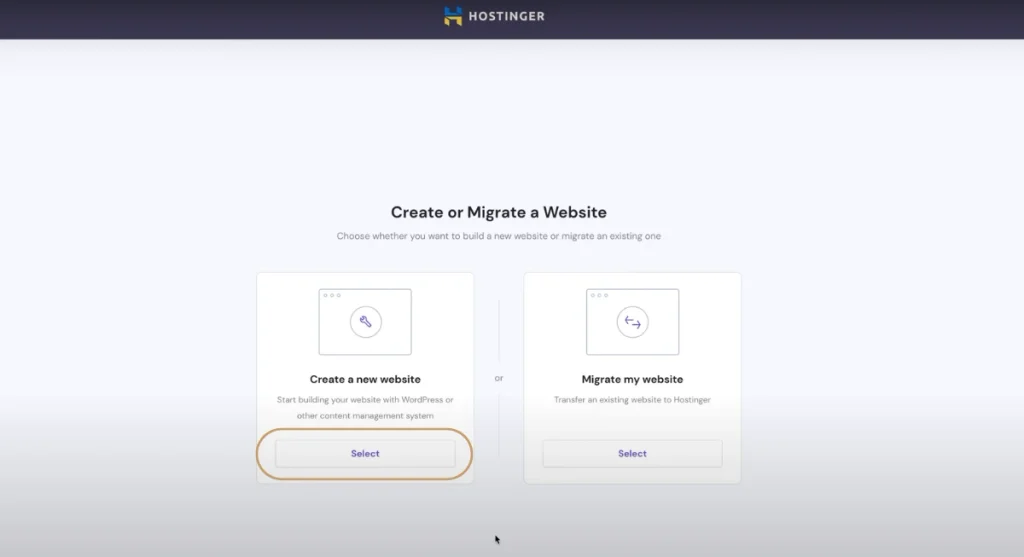
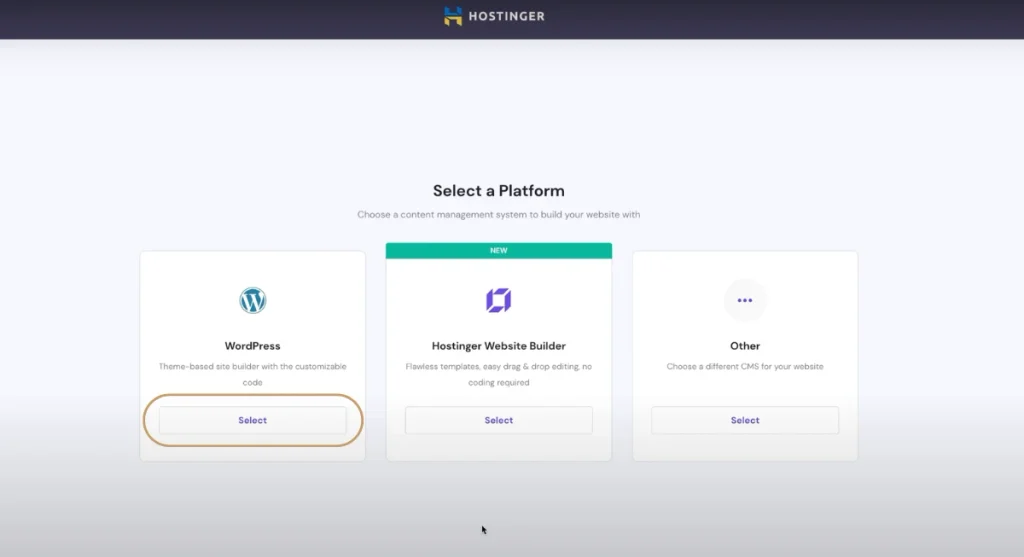
Next, the system will ask you to select your core platform. Go ahead and choose WordPress as your foundation.
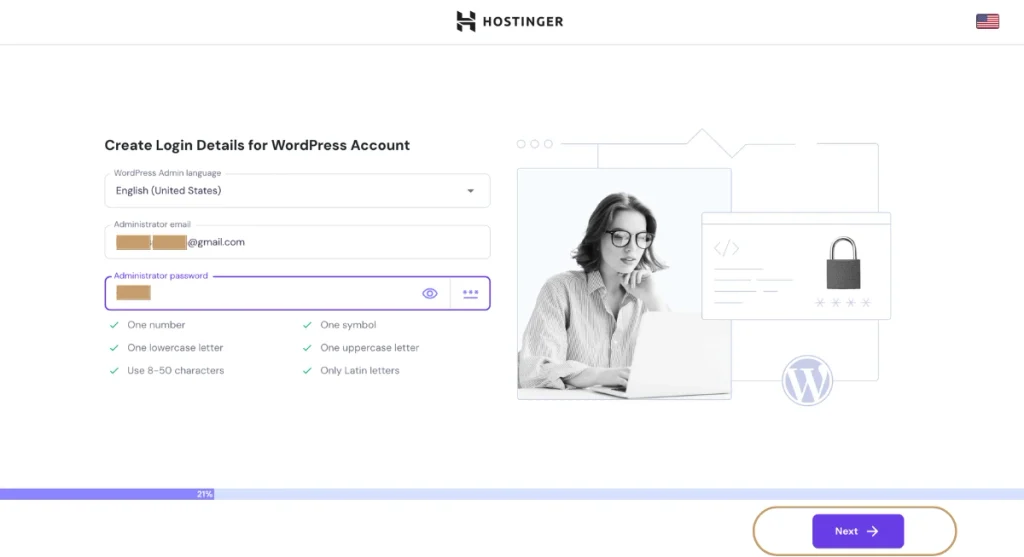
From here, you will be directed to configure your official WordPress administrator credentials. This step is a critical security checkpoint. This admin account grants you complete, unrestricted control over your entire website ecosystem. To keep your business safe from brute-force hackers, make sure you choose a highly secure password and an advanced admin username that cannot be easily guessed. Avoid generic terms like admin or your own first name.
Once your credentials are set, choose the online store option from the setup list.
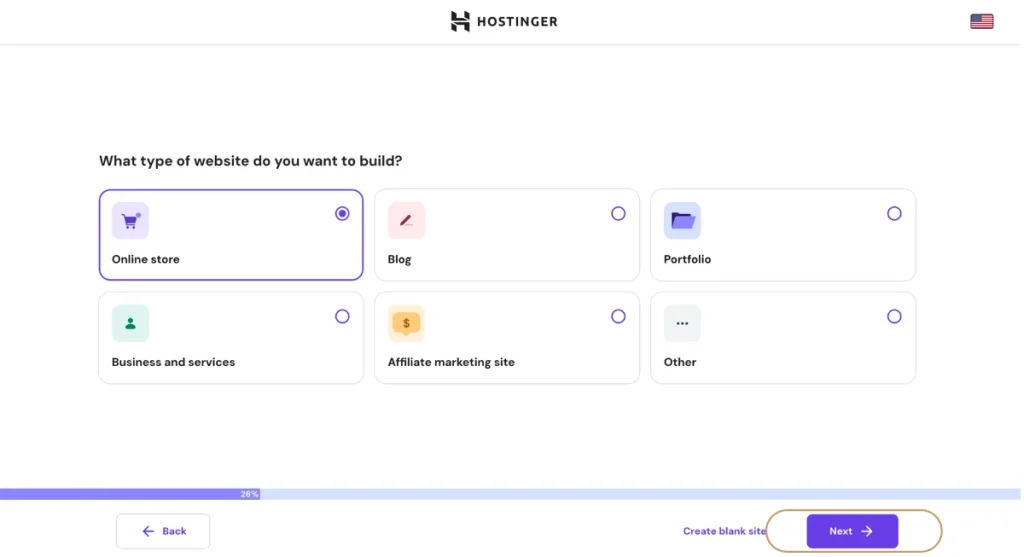
If the system prompts you with a list of suggested starter layouts, simply pick a basic temporary theme for now. We will be overwriting this completely when we deploy our premium design framework later on.
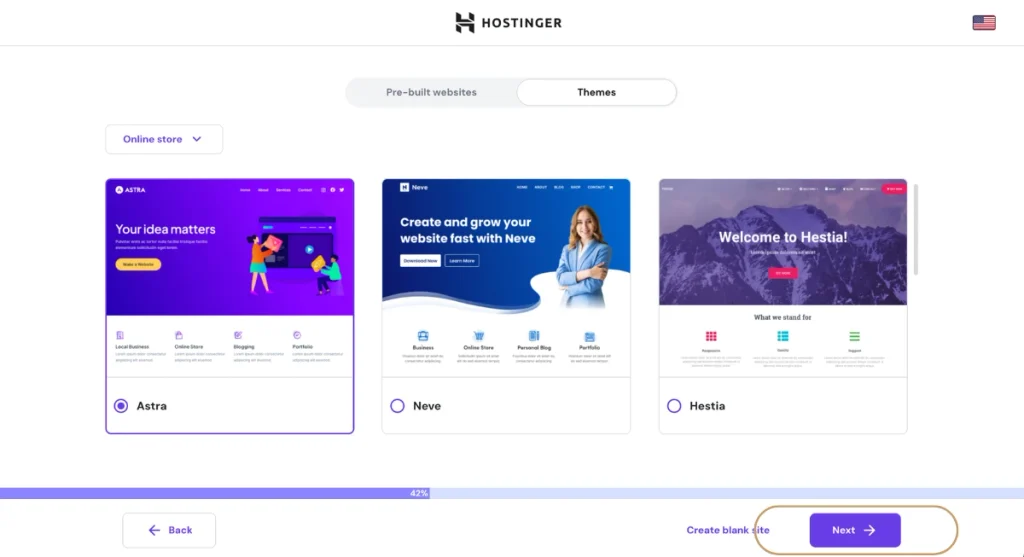
If a window appears recommending popular starter plugins, make sure you check the box for WooCommerce alongside your other preferred operational tools. If your screen looks a bit different, don’t sweat it at all; we can easily install and configure WooCommerce directly from your main WordPress dashboard in just a few moments.
The system may also offer to use an artificial intelligence tool to generate your site’s copy and images. Go ahead and click skip on this step. To build a true authority brand on Hustle Oasis, your content needs your unique, human voice, and high quality design.
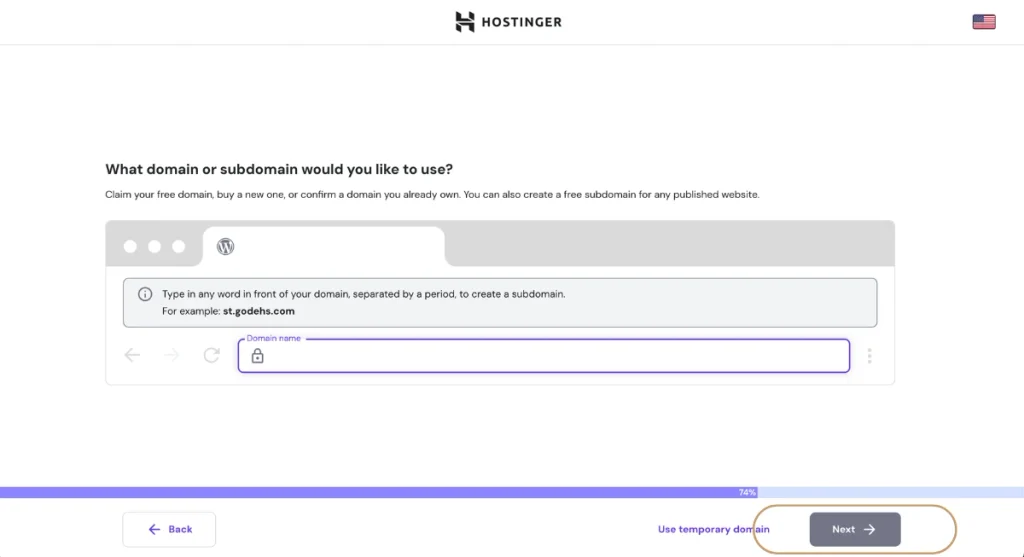
Finally, it is time to attach your official domain web address. If you are starting fresh, use the built-in search bar to check the real-world availability of your desired business title. If you are still brainstorming your business identity, remember that choosing the right name is the first step when you start your own business. You can use the master frameworks inside my guide on How to Choose a Brand Name That Commands Authority to clear a unique name that is both legally safe and optimized for search engine visibility. The moment you see that your dream name is vacant, click select to instantly claim it using the free one-year domain credit included with your hosting package.
If you already own your domain name through a third-party registry, type it directly into the existing domain box and hit next. If you haven’t finalized your brand name yet, don’t let that stall your momentum! Simply select the use temporary domain option to keep moving forward. Hostinger will safely store your free domain credit in your account so you can claim your perfect permanent name whenever you are ready.
How to Link an External Domain to Your Hosting?
If you purchased your domain through an external registrar (like Namecheap or Porkbun) instead of Hostinger, linking it to your new store is incredibly simple.
First, log into the website where you bought your domain, navigate to your central domain details panel, and select the specific web address you want to point to your new store.
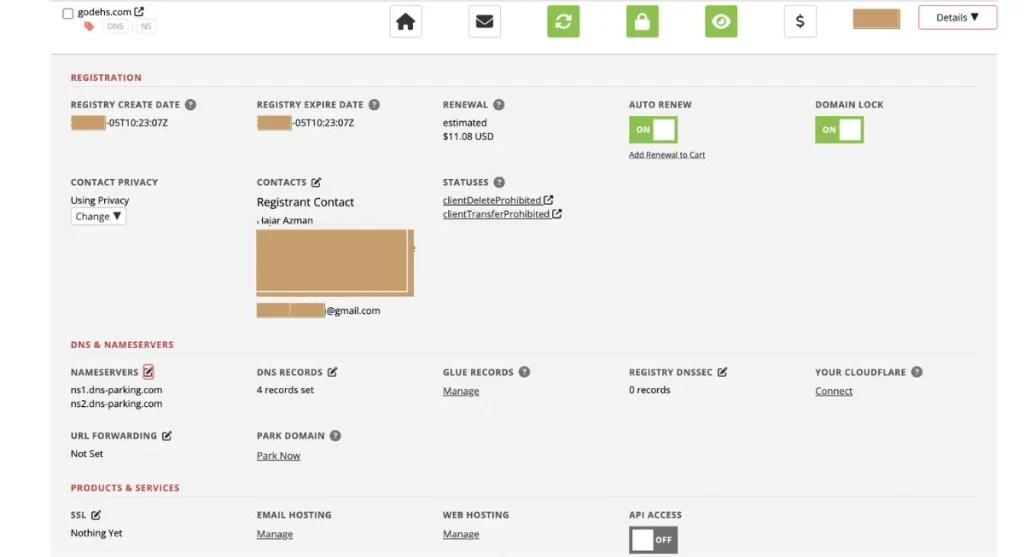
Look for the section labeled Nameservers or DNS Management and click the edit icon. You need to update your authoritative nameservers to point directly to Hostinger’s global network. Delete whatever default lines are currently inside those boxes and replace them exactly with Hostinger’s standard entries:
- ns1.dns-parking.com
- ns2.dns-parking.com
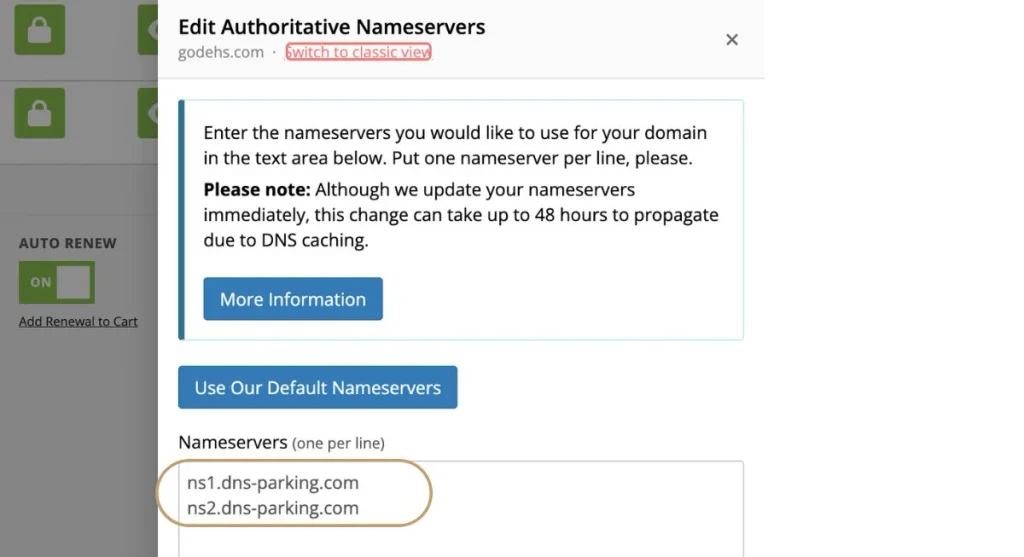
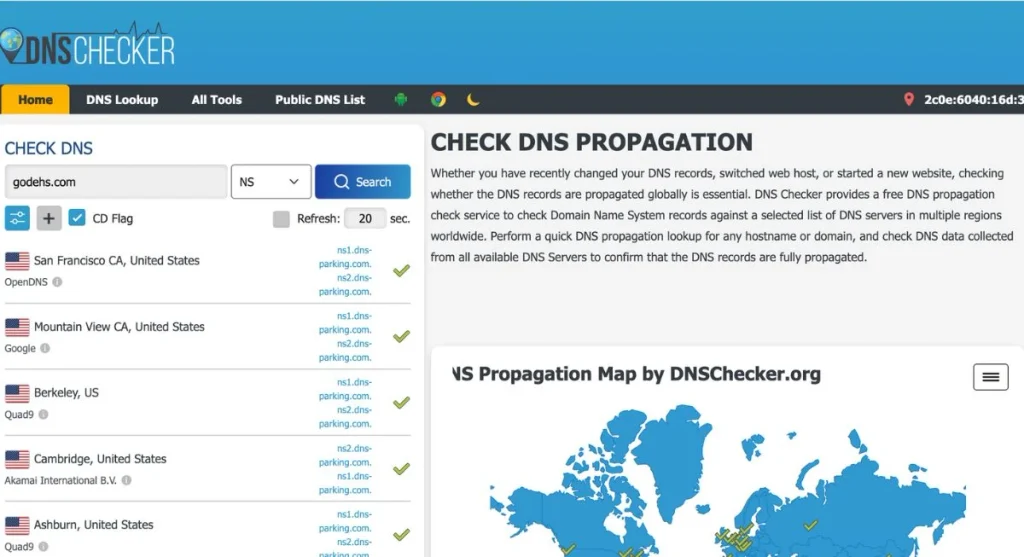
Keep in mind that changing your authoritative nameservers triggers a global internet update known as DNS propagation, which can take anywhere from a couple of hours up to a full calendar day to complete. You can track this process in real-time by using a free tool like DNS Checker:
- Open the DNS Checker Official Tool.
- Type your domain name into the search bar without adding any prefixes like, https://.
- Switch the record type dropdown menu to NS
- Click the search lookup button.
As the changes spread across the globe, you will see green checkmarks pop up showing that your external domain is now successfully routed straight to your new server architecture.
For a smooth setup process, it’s advisable to double-check all information provided during registration and configuration. Ensure your contact details are accurate and avoid selecting unnecessary services that you may not need initially. Setting up an e-commerce website with Hostinger is designed to be as straightforward as possible, thanks to their comprehensive guidance and user-friendly interface.
To ensure your entire setup process runs flawlessly, take a quick second to double-check that all your registration contact details are completely accurate. Avoid checking boxes for unnecessary premium add-on services that you do not actively need to launch your store today. Hostinger has engineered this onboarding flow to be as clean and linear as possible, allowing you to establish a premium, professional backdrop with total ease.
How do you install and set up WordPress?
Now it is time to deploy your core software engine. The absolute best part about using Hostinger is that they handle the entire process through an automated WordPress installation script. If you were using an outdated, traditional web host, you would have to manually create SQL databases, download zip archives, and configure raw files.
With this setup, Hostinger does all the heavy lifting behind the scenes. All you have to do is relax and wait a couple of minutes for the script to finish running its course.
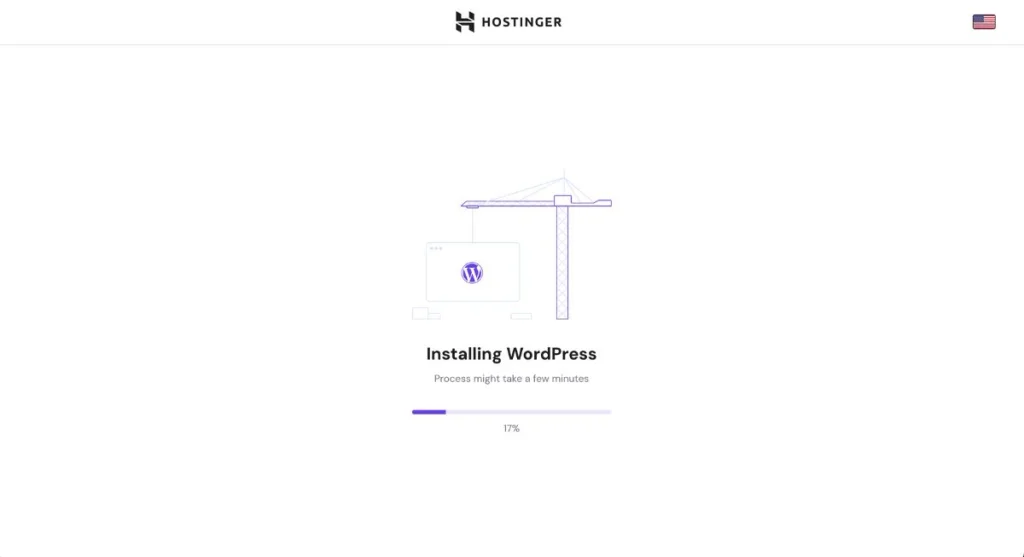
The second the installation completes, Hostinger will display a clear success confirmation message on your screen. You can now access your brand-new, private WordPress dashboard by typing your custom login path directly into your browser URL bar: yourdomain.com/wp-admin . Simply type in the unique administrator username and secure password you created during onboarding.
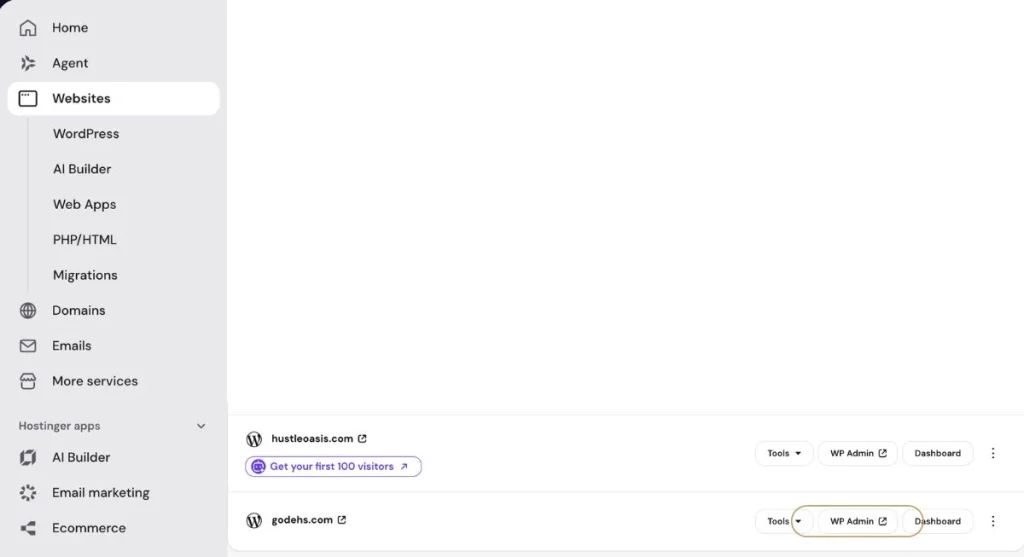
Alternatively, you can log in instantly right from your Hostinger hPanel. Navigate to your Websites screen, look right next to your domain name, and click the bright WordPress Admin button to be securely redirected into your site with a single click.
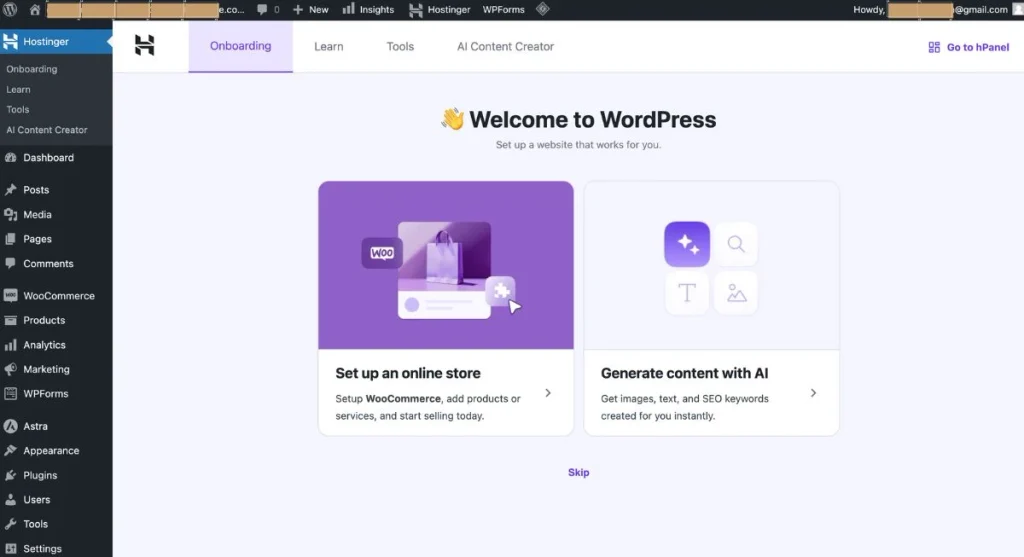
When you log in, you will be greeted by the official WordPress Dashboard. This clean, intuitive workspace is the command center for your entire digital business. Take a moment to familiarize yourself with the main left-hand sidebar menu, paying close attention to core sections like Posts, Pages, Media, and Settings. This is the exact environment where you will oversee your entire creative design process, upload product assets, and publish your content.
How Do You Activate Your Lifetime SSL Security Certificate?
In the modern digital economy, website security is an absolute requirement, not an option. Having an active SSL certificate is what displays that trusted padlock icon in your customer’s browser address bar, letting the world know their private data is fully encrypted.
Normally, Hostinger’s automated system will instantly deploy and install your free lifetime SSL certificate the moment your domain links to your account. However, as an elite entrepreneur, you must always double-check your security parameters before launching.
First, check the URL bar of your browser while logged into your WordPress dashboard. If your address reads http:// instead of https:// , it means your security layer is currently offline. To deploy your lifetime SSL manually, simply step back into your Hostinger hPanel command center. Navigate to the Websites tab, click on your main site’s dashboard button, and look down the left sidebar for the Security section. Click on SSL, open the settings panel, and click the Install SSL button.
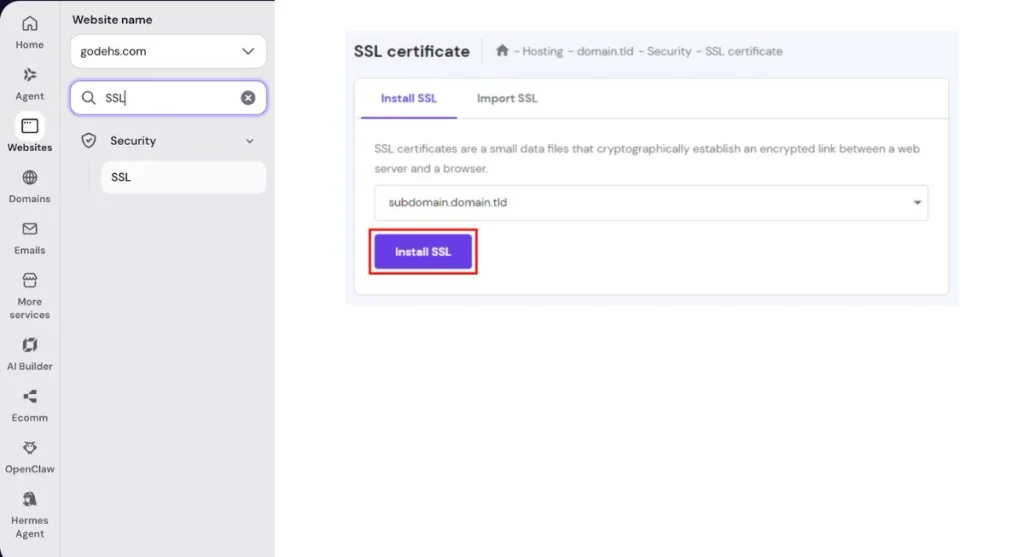
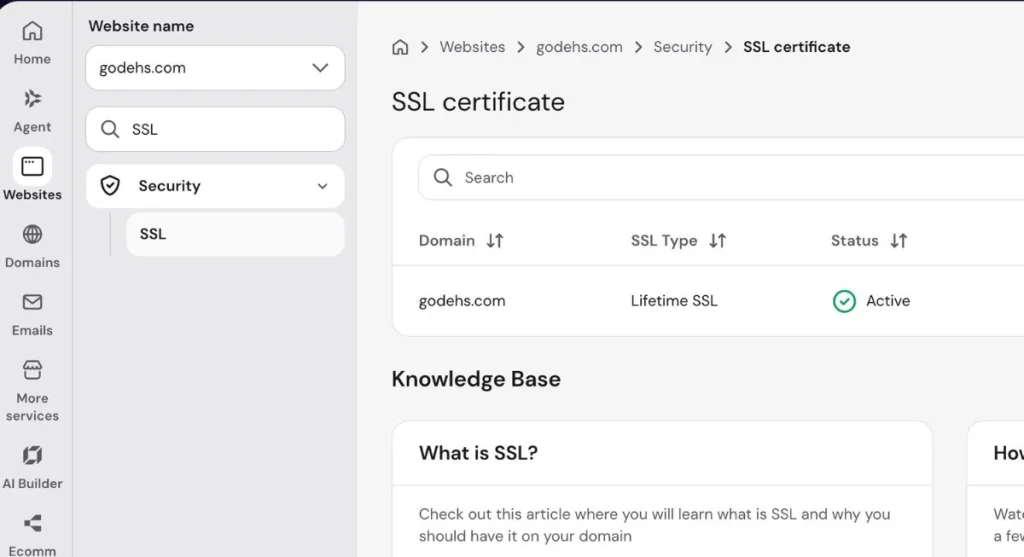
The system will activate your encryption protocols across your server within a matter of minutes. As soon as the deployment finishes, your dashboard will display a bright green Active status notice.
Once your certificate is live, you must instruct WordPress to route every single visitor through this secure protocol. You might be wondering why this extra step is necessary if the certificate is already active on the server. If even a single secondary asset, link, or image URL on your website continues to load using the insecure http protocol, web browsers will trigger a mixed-content warning, displaying a massive notice telling your visitors that your entire online shop is not fully secure. This instantly destroys consumer trust and kills your conversions.
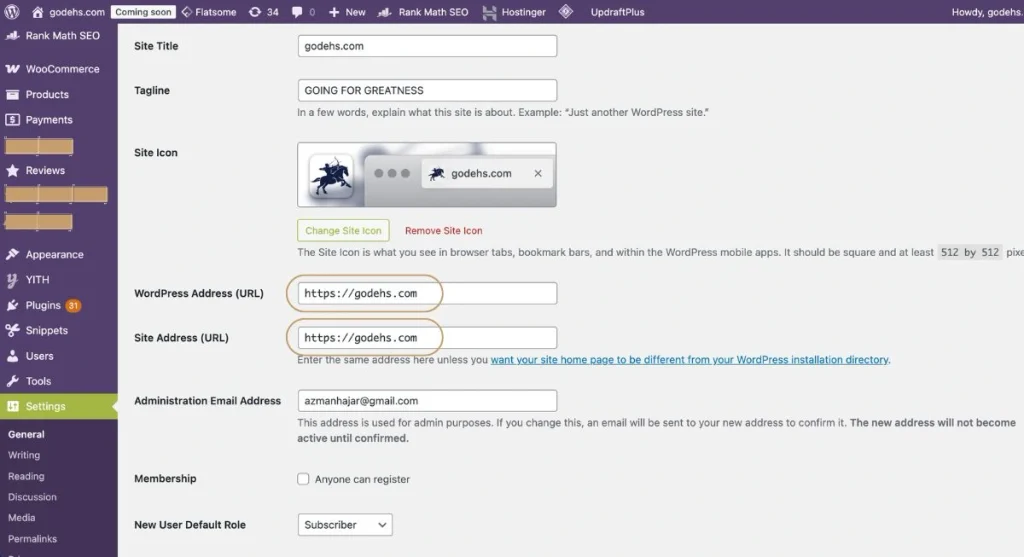
To prevent this, go to your WordPress dashboard, navigate to Settings ➡️ General, and look at the fields labeled WordPress Address (URL) and Site Address (URL). Ensure both boxes explicitly show https:// at the very beginning of your domain name. Scroll to the bottom and click save. This forces every single page asset to load under absolute encryption, locking in a robust, safe foundation for your e-commerce platform.
How Can You Install and Customize the Flatsome WordPress Theme?
With your WordPress framework completely secure and optimized, you are officially ready to deploy your design system. For modern online retail, the Flatsome WordPress Theme stands completely in a league of its own. It is a highly versatile, incredibly lightweight theme engineered specifically for WooCommerce.
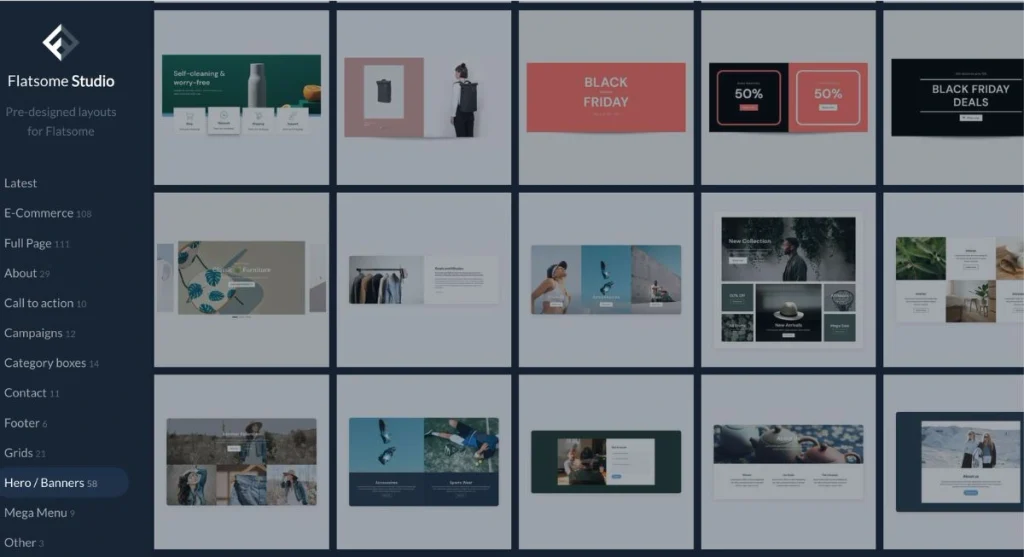
Flatsome strips away the need for complex web development by handing you an intuitive, visual drag-and-drop page builder called the UX Builder. It also includes an extensive library of beautiful, pre-built studio templates, meaning you never have to design an online shop from a blank screen.
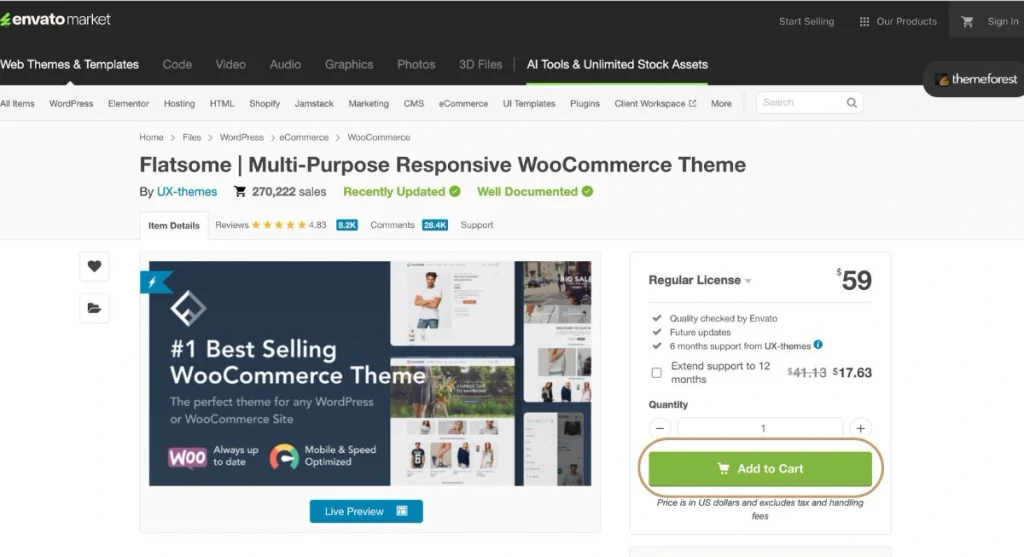
Before we dive into the installation steps, keep in mind a critical asset management rule: each individual Flatsome license entitles you to use the theme on a single live business project. If you decide to launch a second store on a completely different domain down the line, you will simply purchase a separate license to cover that new venture.
Your very first step is to purchase your copy of the Flatsome theme from the official online creative marketplace on ThemeForest.
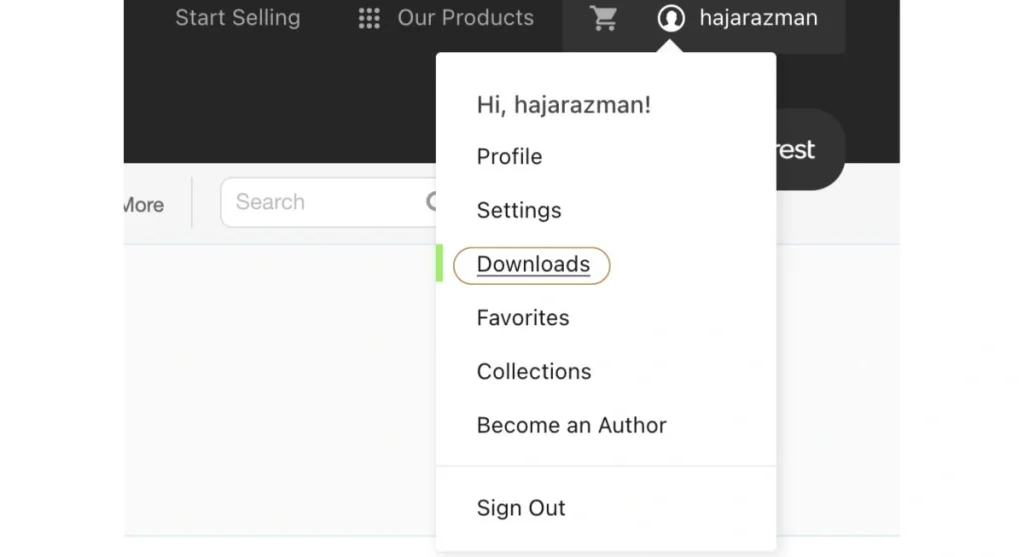
After your checkout clears, hover over your profile account name in the top-right corner of the marketplace dashboard and click on the Downloads option from the dropdown menu.
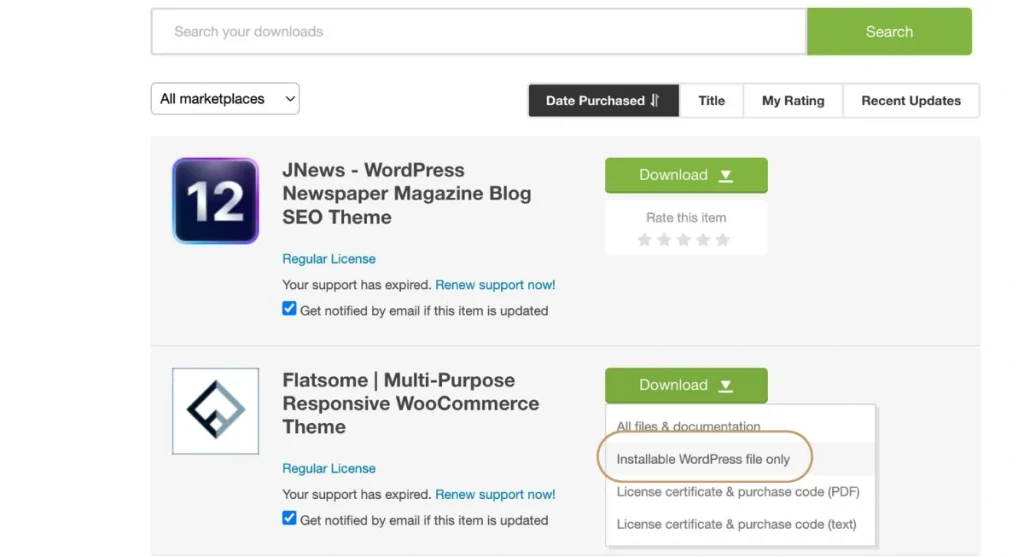
Inside your ThemeForest dashboard, locate Flatsome | Multi-Purpose Responsive WooCommerce Theme from your list of purchased items. Click on the download dropdown menu and select the option for the Installable WordPress file only.
If you accidentally download the entire package containing documentation and license folders, don’t worry. Simply open that main folder on your computer, locate the specific, compressed Flatsome zip archive inside, and extract it. That single zip file is the only piece we will be uploading into WordPress.
Now, return to your fresh WordPress dashboard. Look down the left-hand sidebar menu, hover your mouse over Appearance, and click on Themes.
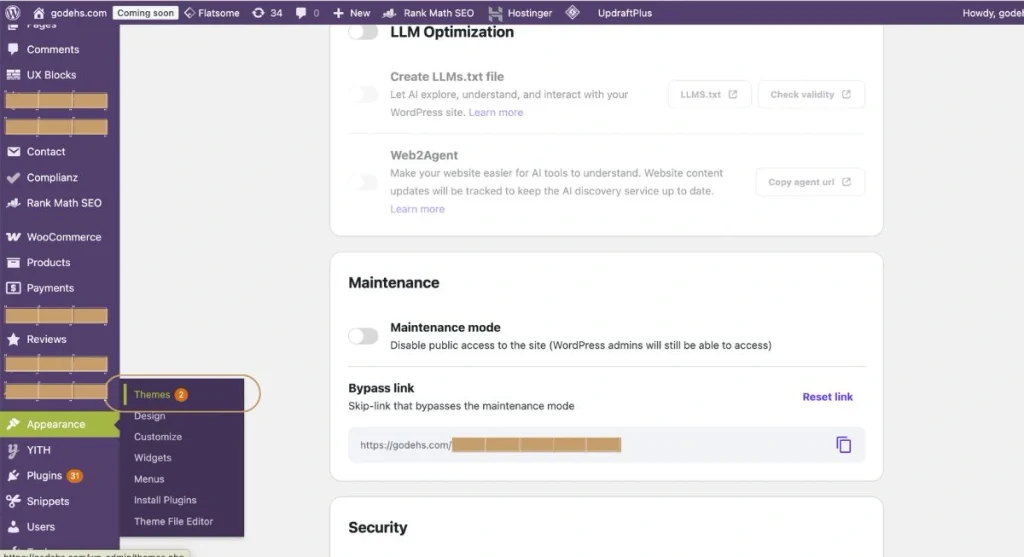
At the very top of the Themes page, click on the Add New button. Next, click on Upload Theme at the top left, and click the Choose File button.
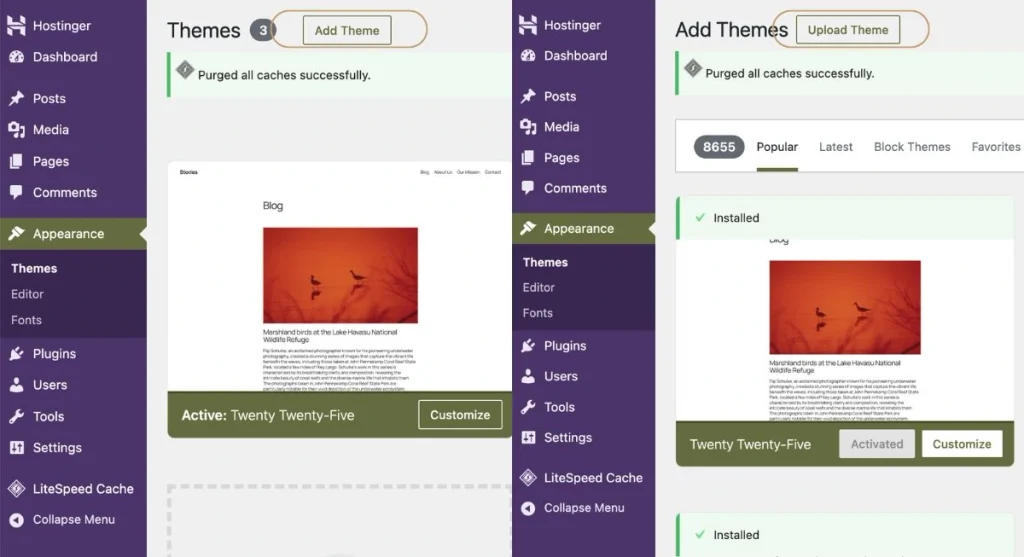
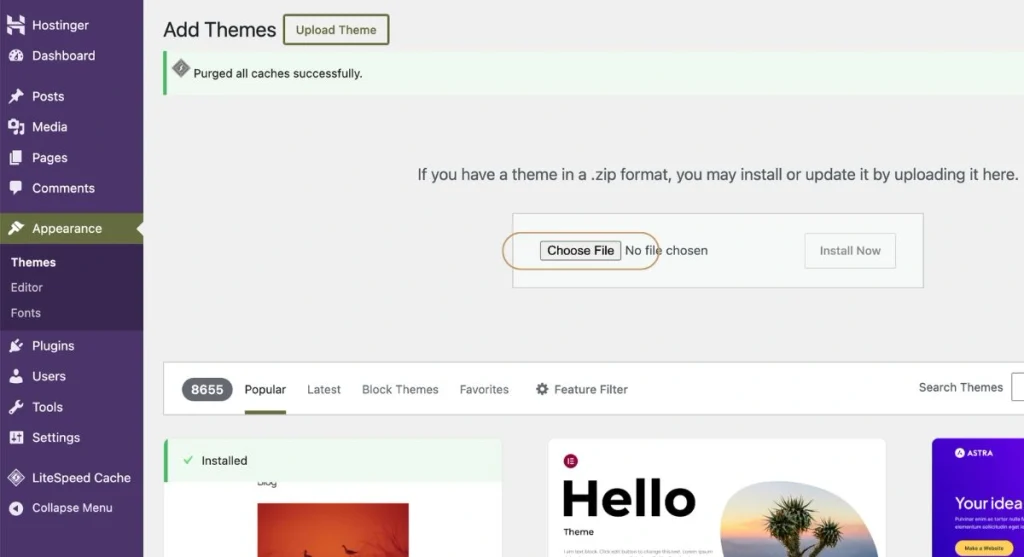
then select the downloaded .zip file from your desktop, and click Install Now.
Select the installable Flatsome zip file you just saved to your computer, and click Install Now.
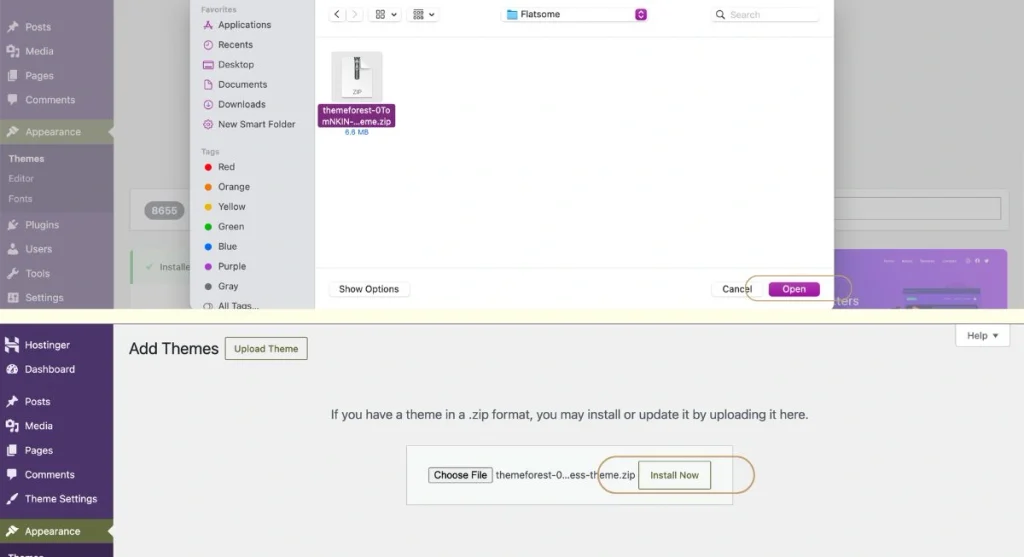
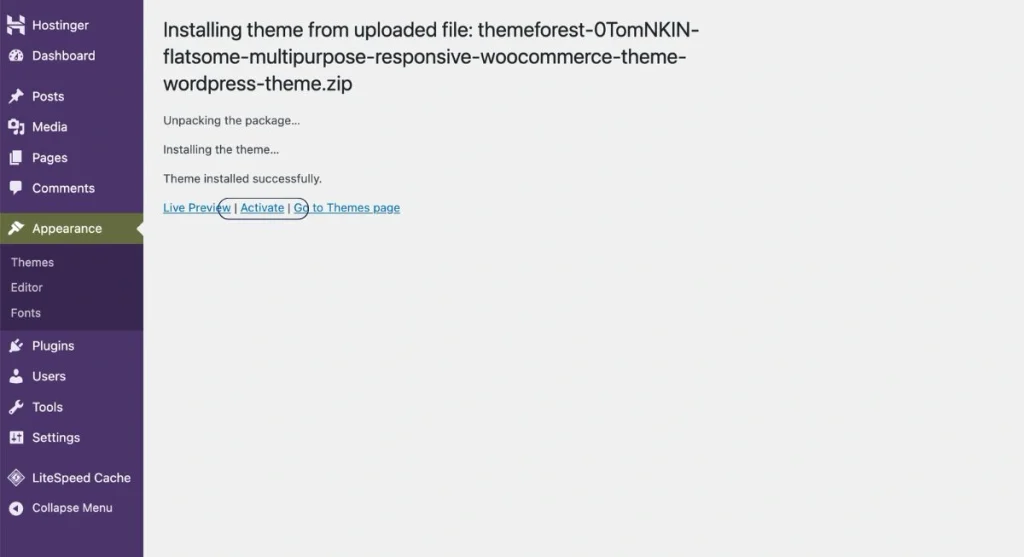
The system will take a quick moment to unpack and upload your design framework. The moment the code uploading process finishes running, click the Activate button to bring your new theme to life.
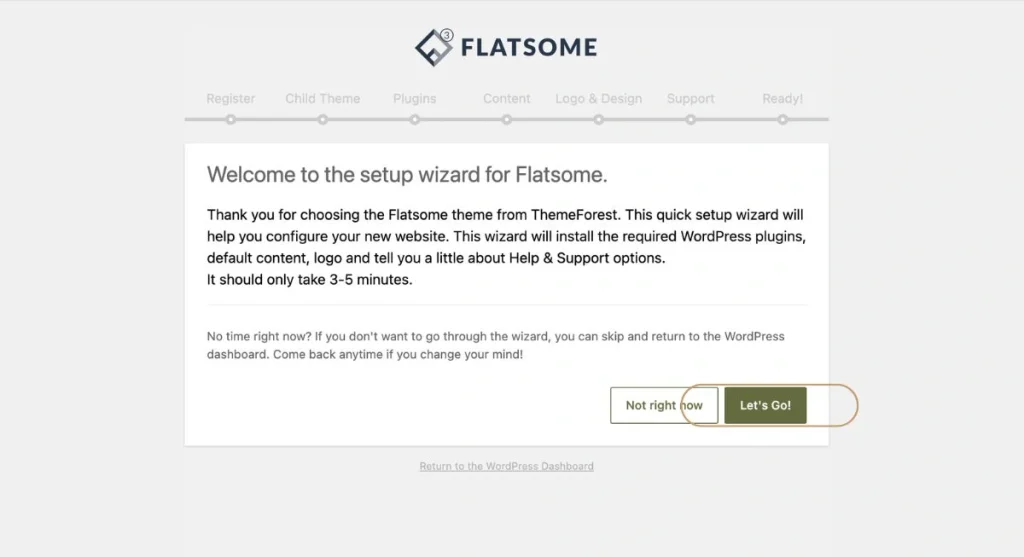
WordPress will instantly redirect you to the main welcome screen of the official Flatsome Setup Wizard. Take a deep breath, appreciate how far you have already come, and click the Let’s Go! button at the bottom of the wizard container to kick off your customization sequence.
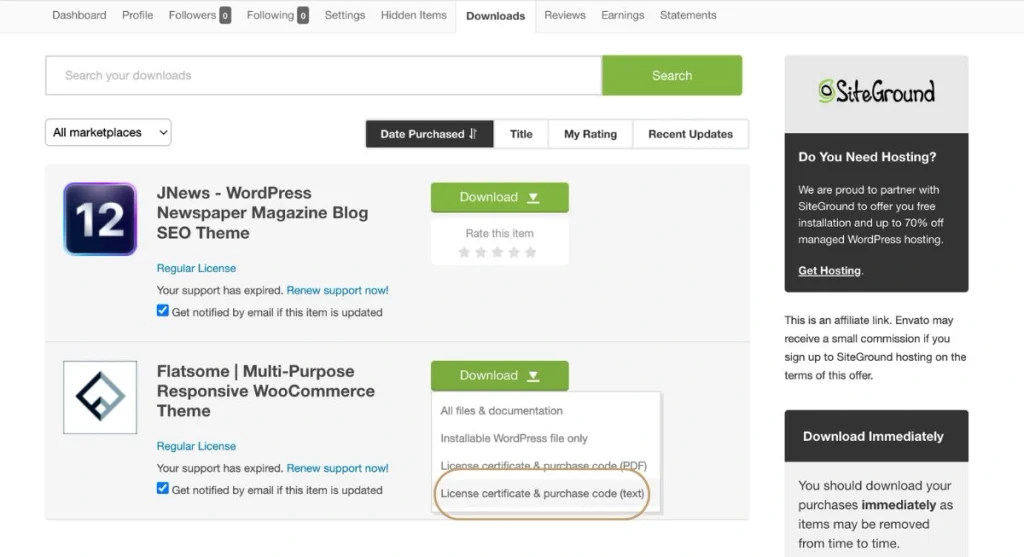
To activate your premium features and lifetime theme updates, step back over to your ThemeForest downloads dashboard. Click the download dropdown on the Flatsome item again, and select the License Certificate & Purchase Code (text). Open that file and copy your unique, multi-digit code sequence.
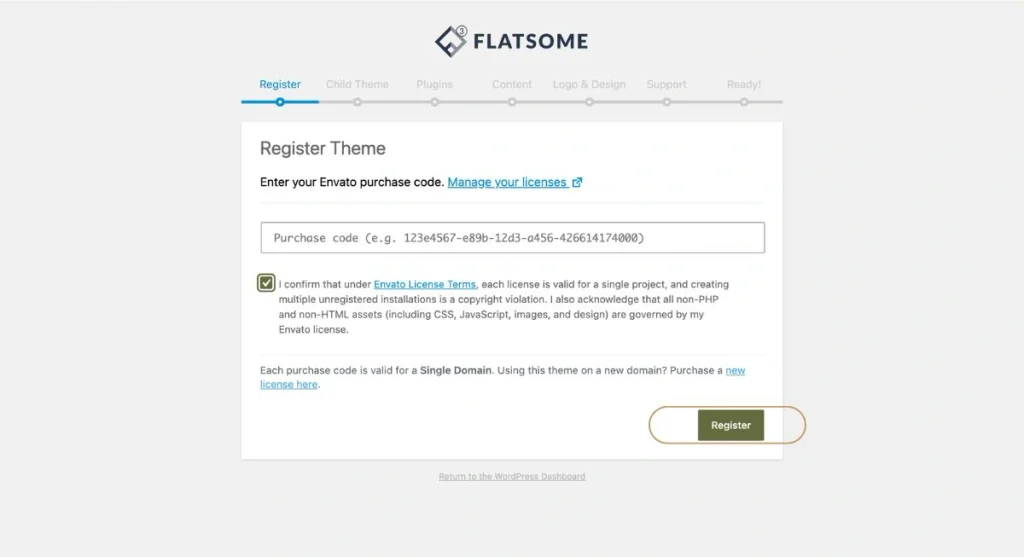
Paste that exact Item Purchase Code directly into the text box provided by the setup wizard, check the compliance confirmation box, and click Register.
Your next screen will prompt you with an incredibly vital step: Setting up a Flatsome Child Theme. Please, do not listen to the temptation to skip this page. A child theme acts as a protective shield for your website’s custom design. When the creators of Flatsome release a software update down the road, your server will update the main theme files while safely leaving your personal design tweaks, custom fonts, and styling code untouched inside your child theme. If you build your site without a child theme, a single software update could instantly erase all your hard design work. Click Create and Use Child Theme to let the wizard build, name, and activate your child theme behind the scenes, then click Continue.
Next, the onboarding system will state that a selection of core plugins is required or highly recommended to unleash the full capabilities of your theme. Go ahead and click Continue. The system will launch an automated batch-installation script, downloading, setting up, and fully activating every single tool on that list simultaneously. Give this step a quick minute to fully load its assets.
Once the plugin script clears, the wizard will ask if you want to import their official dummy content package, including ready-to-use sample pages, custom menus, contact forms, and starter placeholder products. Make sure these boxes are checked and click Import. This is a game-changer for beginners. Instead of staring at a blank, intimidating white screen trying to figure out where to start, this import injects a beautifully structured, fully designed layout onto your server. All you have to do is step inside and swap out their default text and placeholder graphics for your unique brand assets.
From here, the wizard will guide you to upload your primary business logo file and select a stylistic preset that aligns with your brand vision. Once you pick your favorite layout style, click Continue.
Click on the Agree and Continue button on the next screen. The final page of the wizard will congratulate you on successfully deploying your new framework! From here, clicking View your new website will take you straight to your frontend, which will now beautifully display your complete, premium Flatsome architecture.
What is the Secret to Mastering the UX Builder and Flatsome Studio?
Customizing your new digital storefront is an incredibly flexible process that gives you full artistic control over your brand. To begin molding the site to your unique vision, navigate to Appearance ➡️ Customize inside your WordPress sidebar dashboard.
The customizer panel opens up a real playground of visual controls. From this single sidebar, you can completely restyle your global header layouts, alter your business color scheme, change your typography fonts, and add advanced custom styling code.
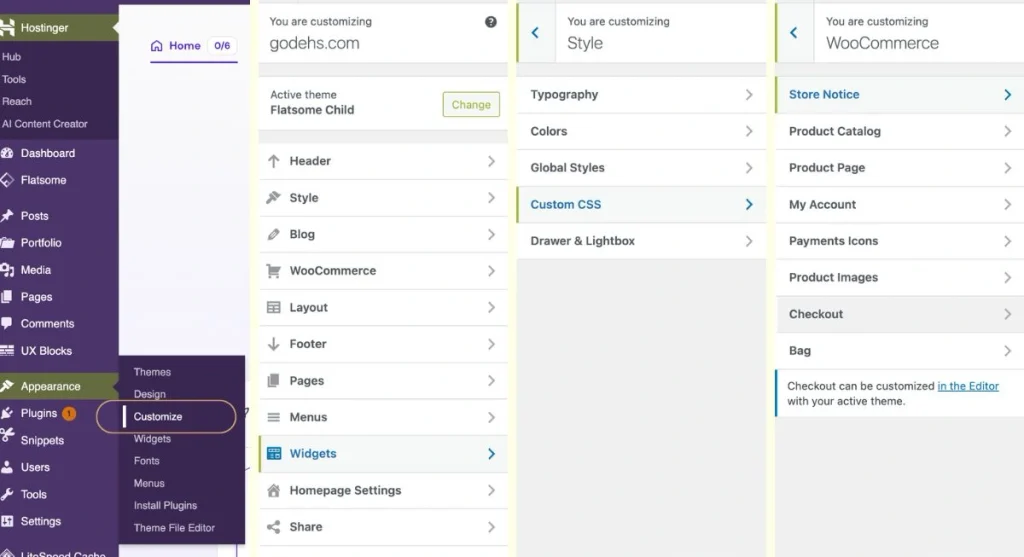
The crown jewel of this theme is its incredibly powerful built-in visual editor: the UX Builder. To design or edit any page on your website, simply navigate to that page inside your dashboard and click the Edit with UX Builder button at the top of your screen.
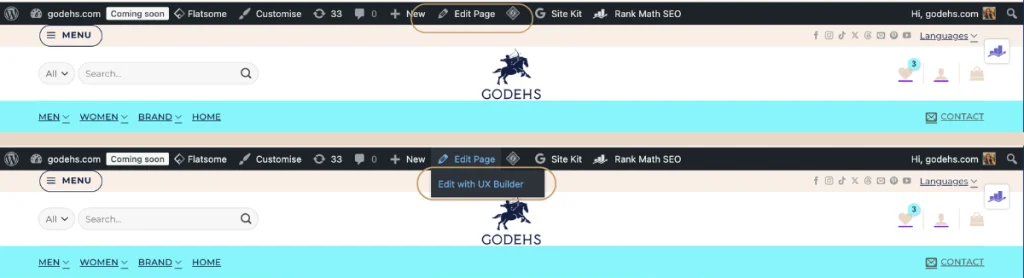
This environment hands you a completely interactive, drag-and-drop design canvas. You can pick up text boxes, rearrange product grids, adjust image banners, and layer beautiful content blocks visually, seeing your changes update in real-time exactly the way your customers will see them. Whether you are building high-converting landing pages, custom product displays, or engaging blog layouts, the UX Builder makes design effortless.
How Can You Accelerate Your Success Using Flatsome Studio Layouts?
If you want to take your store layout to an elite tier rapidly, you need to tap into Flatsome Studio. When you are working inside the UX Builder, you will see a bright icon labeled Flatsome Studio when you click on Add Elements. Clicking this opens up an exclusive, cloud-hosted library containing thousands of pre-designed, premium section templates, call-to-action sections, full page layouts, testimonies, and banners.
Instead of building a section from scratch, you can browse Flatsome Studio, find a layout that fits your vision, and import it with a single click. This feature gives you access to agency-level design standards at absolutely zero extra cost.
To fine-tune your global configurations even further, you can navigate to Flatsome ➡️ Theme Options in your main menu. This area unlocks advanced control modules over backend site performance, deep WooCommerce integrations, and mobile responsive configurations, ensuring your platform stays blazing fast and highly responsive across every device.
How do you install and configure WooCommerce on WordPress?
If you followed along exactly with our Flatsome setup wizard steps, I have fantastic news for you: WooCommerce has already been automatically installed and securely deployed on your WordPress site. The wizard recognized your e-commerce intent and activated the retail software engine behind the scenes while setting up your theme assets.
However, to ensure this guide serves as a manual for any scenario, I want to teach you exactly how to install WooCommerce manually if you ever choose to work with a different theme down the line.
To handle a manual installation, simply log into your main WordPress dashboard. Look down your left sidebar menu, navigate to Plugins, and click on Add New Plugin. Step over to the search bar in the top-right corner of the repository page and type in exactly: Woocommerce.
The official plugin will pop up as the very first result. Click the Install Now button right next to the title. Give the server a few seconds to download the core system files, and the moment that button changes to a bright blue color, click Activate.
WordPress will instantly launch the official WooCommerce setup wizard, walking you through a straightforward onboarding questionnaire where you will input your physical business location, choose your currency parameters, and select the industries you plan to sell within.
How do you set up shipping zones and options in WooCommerce?
If you plan to sell digital products only, feel free to skip to the next section on how to start adding products to your store. However, if you are shipping physical goods to your audience, configuring your shipping infrastructure is notoriously known as one of the biggest friction points for early-stage entrepreneurs.
Trying to figure out how to charge local customers fairly while avoiding losing your profit margins on international orders can feel like a massive puzzle. Let’s break this process down into a simple, logical strategy so you can configure your shipping rules with total confidence.
WooCommerce organizes shipping using a powerful framework called Shipping Zones. A shipping zone is simply a specific geographic region where a defined set of shipping rates applies. You can make a zone as broad as an entire continent or country, or as narrow as a specific list of local postal codes.
To build your shipping rules, navigate to your WordPress dashboard sidebar, click on WooCommerce, and select Settings. From the top tab menu, click on Shipping.
Building Your Local Shipping Zone
Your very first priority is to secure your domestic market. Click the Add Shipping Zone button at the top of the interface.
In the Zone Name field, type a clear label (for example, Domestic Market or Local Region). Under the Zone Regions dropdown menu, select your home country or specific states where your local fulfillment applies.
Once your region is mapped, click the Add Shipping Method button inside that zone box. A popup window will appear offering you three core options: Flat Rate, Free Shipping, or Local Pickup.
Select Flat Rate and click add. Once it appears in your list, click the edit link right under the title to input your baseline domestic shipping cost (for instance, entering 5.00 to charge a flat five-dollar shipping fee at checkout). Click save changes.
Creating an International Shipping Zone
Once your domestic market is secure, it is time to open your business to global scaling and capture overseas sales without destroying your profit margins. To do this safely, you must create a dedicated international shipping rule. If you do not set up a separate international zone, a customer from the other side of the world could purchase your product and only pay your cheap local shipping rate, forcing you to pay the massive overseas courier balance out of your own pocket. Click back into your main Shipping tab and click Add Shipping Zone again.
Name this zone something clear like International Shipping. In the Zone Regions box, select the foreign countries, regions, or continents you are ready to ship your products to (such as Europe, Canada, or Asia).
Click Add Shipping Method, choose Flat Rate once more, and hit edit. Because global courier services carry much higher fulfillment costs, adjust this price box to accurately reflect your true international logistics pricing (for example, entering 25.00 for a flat twenty-five-dollar overseas shipping fee).
WooCommerce is incredibly smart. When a customer inputs their shipping address at your checkout, the system instantly geolocates their country, references your custom Shipping Zones, and displays the exact corresponding rate automatically, protecting your revenue while ensuring a seamless, transparent checkout experience for your global buyers.
4 The Art of Product Management and Presentation
How do you add simple and variable products to your store?
Now that your digital architecture is secure, your hosting engine is roaring, and your shipping zones are locked in, it is time to handle the most exciting phase of your entrepreneurial journey: filling your store shelves. Your product pages are the true heartbeat of your business. They are where your vision transforms into real-world revenue.
WooCommerce makes product management incredibly flexible, but as a beginner, you must master the two fundamental types of products you will be offering to the world: Simple Products and Variable Products. Understanding the psychological and technical difference between these two layouts will allow you to present your inventory efficiently.
The Foundation: What is a Simple Product?
A Simple Product is exactly what it sounds like. It is a single, standalone item that has no unique options, variations, or dropdown menus for your customer to choose from. Think of a physical book, a pre-packaged supplement, a one-size-fits-all backpack, or a digital ebook. The item carries a single price point, a single stock tracking code, and it delivers exactly as shown on the screen.
To add your very first item, look at your WordPress left-hand sidebar, navigate to Products, and click Add New.
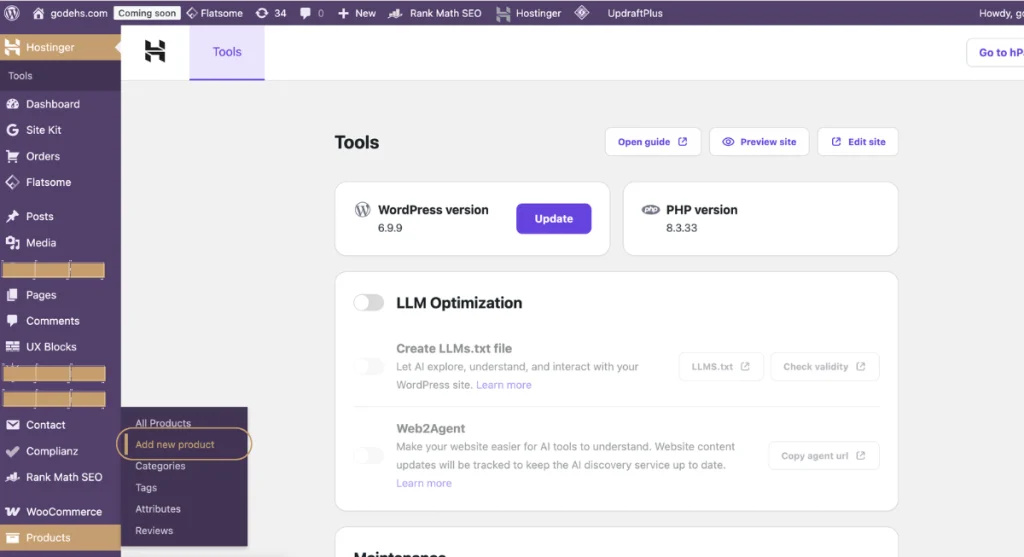
You will be greeted by a spacious, clean interface that operates just like a standard blog editor. This is your creative canvas. Type your compelling, benefit-driven product title right into the top header field, and write your detailed, engaging product story in the main text box below.
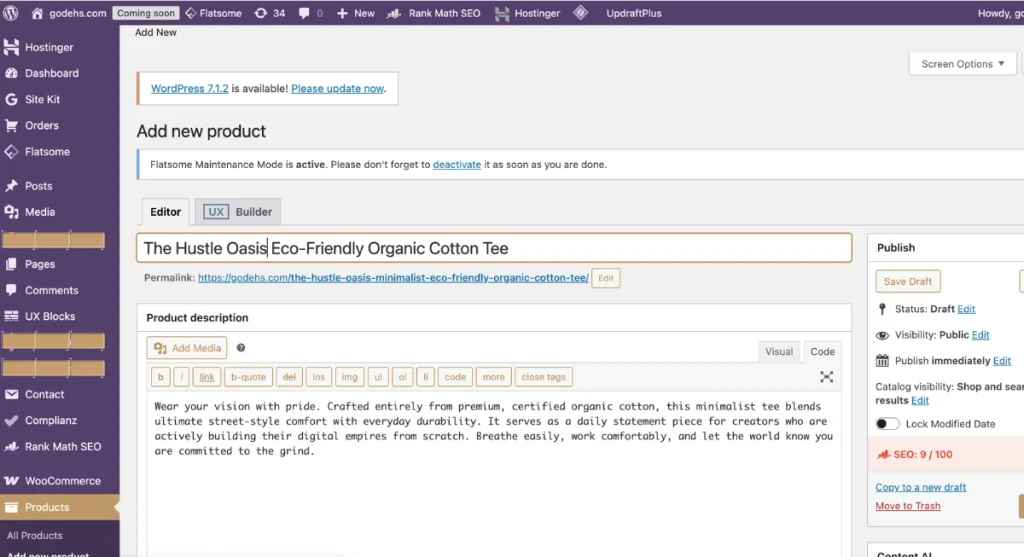
Once your text is complete, scroll down slightly until you see the central command block for your business operations: the Product Data box. By default, the dropdown menu at the very top of this box is already set to Simple Product.
This is the exact moment where you define the structural nature of what you are selling. If you are launching a physical brand asset, you will leave the settings exactly as they are. However, if you plan to scale your digital empire using low-overhead assets, like selling a 90-day startup launch blueprint online guide, you will simply check the Virtual and Downloadable boxes located right next to that primary dropdown menu. Checking these boxes is a massive game-changer: it tells WooCommerce to completely strip away shipping calculation fields at checkout and automatically email a secure download link straight to your customer’s inbox the second their payment clears.
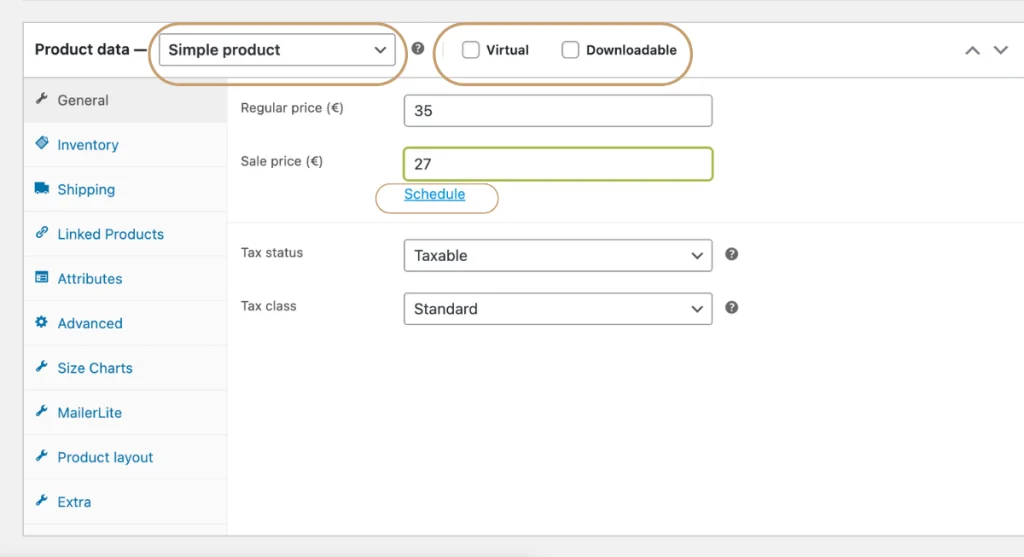
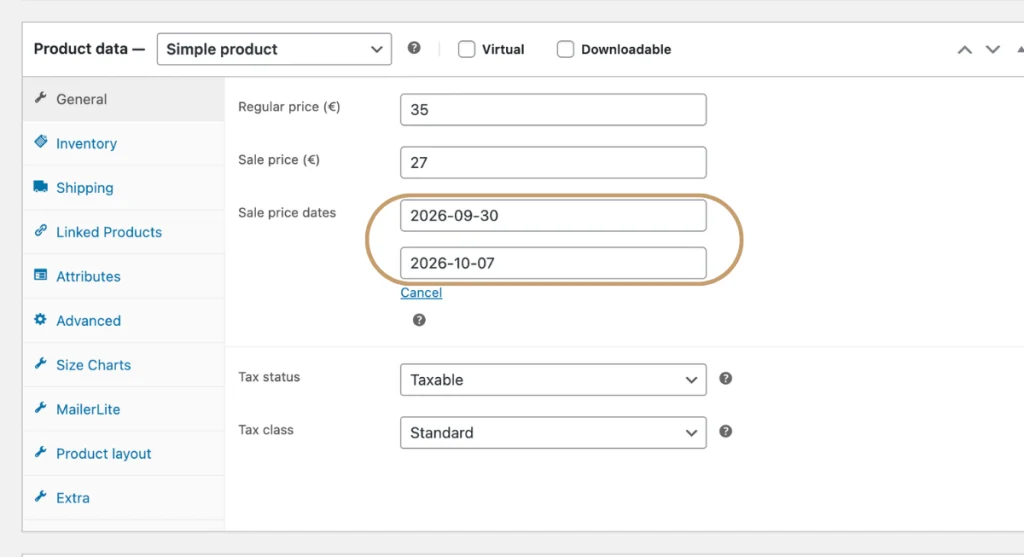
Now, look down inside the General tab of this box to set up your financial parameters. Type your standard retail price directly into the Regular Price field. If you want to launch a powerful promotional campaign to build immediate momentum and drive consumer urgency, input a lower price into the Sale Price field. You can even click the Schedule link to program your sale to start and stop on specific calendar dates automatically, giving you hands-free control over your marketing spikes.
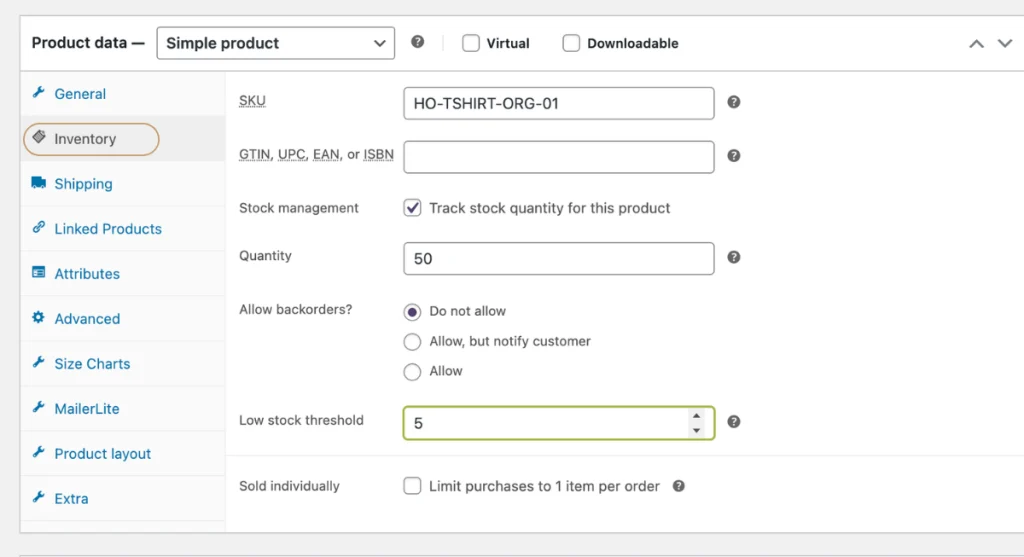
Next, step over into the Inventory tab on the left sidebar to secure your operational tracking. Start by typing in your unique SKU (Stock Keeping Unit) string to give your item its signature retail identity. Right below that field, make sure to check the box to enable stock tracking. This crucial step tells WooCommerce to act as an automated warehouse manager, counting down your live inventory numbers with every single successful checkout to protect your brand from the ultimate customer service nightmare: accidentally overselling an item you don’t actually have on hand.
While you are here, remember to configure your Low stock threshold number. By setting this up, WooCommerce will send a private, automated email alert straight to your inbox the exact moment your inventory drops to that baseline count, giving you plenty of advance notice to restock your shelves seamlessly.
Finally, if you are selling a physical product, click over to the Shipping tab to input your parcel parameters. Type in the true weight of your product along with the exact length, width, and height dimensions of the poly-mailer or box you will use to send it. This structural data allows the checkout system to automatically communicate with global courier networks, displaying perfect, highly accurate carrier rates to your buyers while completely protecting your business profit margins from hidden shipping losses.
The Powerhouse: What is a Variable Product?
A Variable Product is a single item that comes in multiple variations, such as different sizes, colors, materials, or styles. Think of a graphic t-shirt that comes in Small, Medium, and Large, or a luxury watch available in both gold and silver finishes. Instead of confusing your buyers by creating three separate, cluttered product pages for the exact same item, a Variable Product keeps everything elegantly organized on one page with a clean dropdown menu for your customer to pick their preference.
To unleash this capability, go to that same Product Data box, click the dropdown menu, and change it from Simple Product to Variable Product.
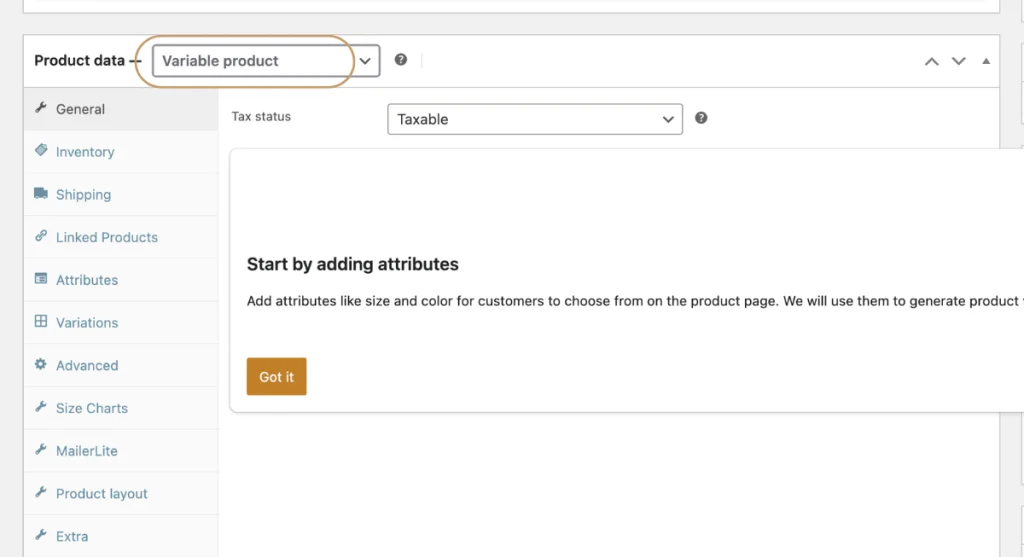
Setting this up requires a simple two-step process: defining your Attributes and generating your Variations.
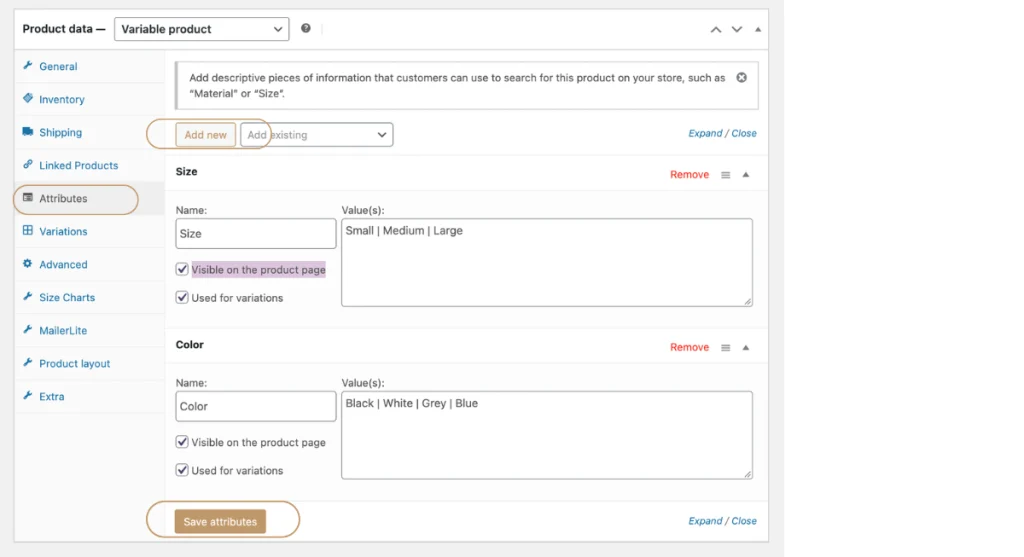
First, click on the Attributes tab inside the product data box. Click the Add New button and give your attribute a clear, recognizable title, like Size or Color. In the values box, type out your options separated by a vertical pipe bar (for example, typing: Small | Medium | Large). Before moving forward, make sure you check the boxes labeled Visible on the product page and Used for variations, then hit the save attributes button. Checking these settings tells the system to display these choices beautifully to your buyers while prepping the backend to build your individual option rows.
Second, click right down into the Variations tab. Click the dropdown menu and select Generate variations from all attributes, then click go. WooCommerce will instantly run an automated script behind the scenes, creating a separate, dedicated control panel for every single option combination you just defined.
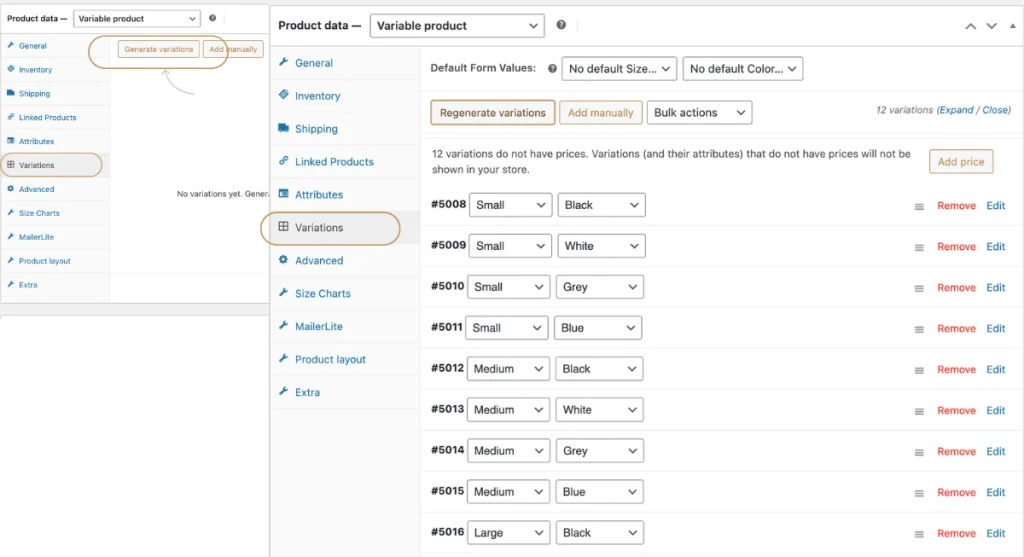
Clicking to expand any individual variation allows you to customize it completely. You can assign a unique photo, set a completely different price (for example, charging slightly more for an Extra Large size), and track its independent stock levels. When you hit publish, your storefront will display a beautiful, fluid menu that makes purchasing effortless for your audience.
What are the best free WordPress themes for WooCommerce?
While this guide explicitly showcases the incredible design power of the Flatsome theme, I want to ensure you have complete perspective on the entire WordPress ecosystem. When you are launching on a bootstrap budget, you might want to experiment with a free design framework before moving up to a premium asset.
However, we need to set some very realistic expectations here as fellow entrepreneurs. While free themes are a fantastic way to practice, test ideas, and get your feet wet without any upfront cost, they come with a ceiling. Free themes are intentionally limited. They offer basic styling options, restrict your control over advanced layouts, and often lack the high-converting features like built-in product quick views, custom headers, and advanced drag-and-drop builders that come standard with premium licenses.
To build a true corporate powerhouse that can scale to thousands of sales, you will want to upgrade to a premium theme like Flatsome as soon as your budget allows. Think of a free theme as a reliable bicycle to get you started, and a premium theme as the sports car engine that takes your business to the global stage.
If you need to start with a free option today, you must be extremely cautious. A poorly coded free theme will slow your website down, destroy your user experience, and tank your Google rankings. Speed is a vital ranking factor for modern e-commerce. If your store takes more than three seconds to load, over half of your visitors will click away before buying.
To keep your digital storefront blazing fast while you build your initial momentum, here are the absolute top three free, highly optimized WordPress themes engineered specifically to integrate with WooCommerce:
Astra Theme
Astra is a legendary industry leader for a reason. It is incredibly lightweight, requiring less than 50KB of data to load, which ensures your online store loads with lightning speed right out of the box. Astra includes a basic WooCommerce optimization module that allows you to customize your product grids and shopping cart flows. It integrates flawlessly with major visual page builders, making it a fantastic, clean starting point for any beginner.
- 💰 Real-World Upgrade Cost: When you are ready to transition your business into a retail powerhouse, the Astra Pro Add-On Only License upgrade costs $69 per year (or a one-time payment of $249 for a lifetime license), covering up to 3 separate websites.
OceanWP
If you want deep, heavy-duty e-commerce features entirely for free, OceanWP is an absolute powerhouse. This theme is highly responsive and comes pre-packed with advanced features that most other free themes hide behind a paywall, such as a floating add-to-cart bar and a multi-step checkout flow designed to lower cart abandonment rates. It is highly customizable and built with clean SEO code, giving your store a brilliant head start in search result rankings.
- 💰 Real-World Upgrade Cost: To fully lift layout caps and tap into their comprehensive library of 200+ advanced conversion templates, you can unlock the OceanWP Core Extensions Bundle Starter Plan for $42 per year for 1 site, or step up to the Personal tier at $51 per year for 3 sites.
Blocksy
Blocksy is a modern, next-generation WordPress theme built on top of the native block editor infrastructure. It is incredibly fast, hyper-optimized for mobile screens, and features a gorgeous, clean visual aesthetic that makes your products look like they belong in a high-end luxury marketplace. Blocksy gives you intuitive control over your product page headers and galleries, providing a great visual environment that reduces the beginner learning curve.
- 💰 Real-World Upgrade Cost: Moving past standard limitations to experience premium visual shop additions requires the Blocksy Pro Personal Plan, which scales in at $69 per year for an annual subscription or a flat $199 one-time fee for a lifetime single-site license
5 Payment Security and Location Optimization
How do you connect payment gateways to WooCommerce safely?
Now that your shelves are filled with beautiful products, it is time to open up the financial channels and prepare your storefront to collect revenue. Connecting payment gateways can feel like a high-stakes step, but WooCommerce is engineered to make this process incredibly secure for both you and your buyers. To build a world-class platform, you want to offer your customers the most trusted, frictionless checkout experiences available globally. We achieve this by integrating the two undisputed giants of online processing: Stripe and PayPal.
Capturing Direct Credit Card Sales with Stripe
Stripe is the gold standard for modern e-commerce. It allows your customers to type their credit card details directly into your checkout page without ever redirecting them to an external website, keeping your user experience entirely seamless and highly professional.
To set this up safely, go to your WordPress dashboard, navigate to Plugins ➡️ Add New, and search for the official WooCommerce Stripe Payment Gateway plugin. Once installed and activated, click on the settings link. Stripe handles security using encrypted digital access strings called API Keys.
Simply create a free merchant account on the official Stripe website, navigate to your developer dashboard, and copy your unique keys. Paste these keys directly into your WooCommerce fields, turn the toggle to live mode, and your store is instantly authorized to accept major credit cards securely from anywhere in the world.
Adding Instant Trust with PayPal
PayPal carries immense psychological trust across the global marketplace. Many online shoppers prefer using it because they can complete their purchase with a single click using their stored account balance, without needing to pull their physical wallet out of their pocket.
To add this trusted shield, deploy the official WooCommerce PayPal Payments plugin. The integration flow here is beautifully simple. When you access the plugin settings, you will see a prominent button labeled Connect to PayPal. Clicking this opens a secure, official popup window where you simply log into your PayPal Business account and grant permission to link with your store. The system automatically syncs your credentials behind the scenes, ensuring every dollar processed flows safely straight into your business bank account.
How do you configure WooCommerce to display prices dynamically based on location?
This is where we unlock your true competitive advantage. In the global digital economy, treating every visitor exactly the same is a massive mistake that can cost you significant revenue. If a customer from Europe lands on your site and sees prices strictly listed in US Dollars, or if an international buyer gets hit with unexpected localized taxes only at the final step of checkout, they will instantly abandon their cart out of frustration.
Your unfair advantage lies in using WooCommerce’s built-in Geolocation engine to display dynamic, smart pricing based on the visitor’s real-world location.
To activate this optimization feature, navigate to WooCommerce ➡️ Settings and ensure you are on the General tab. Scroll down to the General Options area until you find the setting labeled Default customer location. Click the dropdown menu and change it from the standard setting to Geolocate (or Geolocate with page caching support if you are running speed optimization plugins). Scroll to the bottom and click save changes.
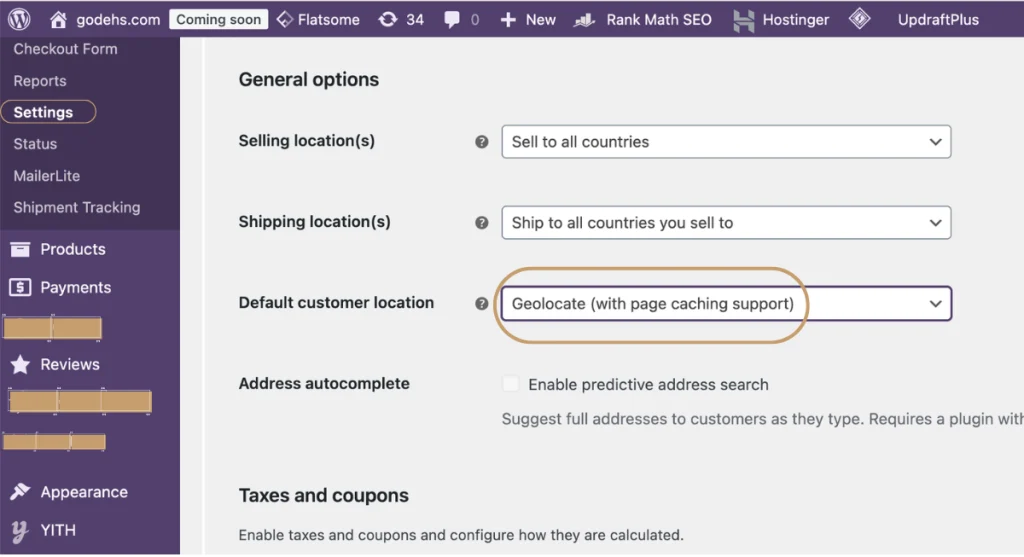
The absolute second this toggle goes live, your website transforms into a smart platform. When a visitor lands on your online shop, the server instantly reads their incoming IP address, determines their exact country, and automatically adjusts your checkout behavior.
If you pair this geolocation feature with a free multi-currency plugin like FOX Currency Switcher, your store will dynamically convert your standard prices into the visitor’s local native currency automatically. A shopper in the UK will see your organic tee priced beautifully in British Pounds, while a shopper in Germany sees Euros.
Furthermore, you can leverage this exact same geolocation engine to solve one of the biggest headaches in global business: calculating international sales tax and VAT (Value Added Tax). Normally, trying to manually figure out the shifting tax laws for customers buying from different states or different countries is an absolute nightmare.
But when you turn geolocation on, WooCommerce automatically detects where your buyer is standing the exact second they head to your checkout page. The system instantly applies the precise, legally required tax rate for their specific region right onto their invoice. This means if a customer buys your product from a country with strict tax laws, like the UK or the EU, the correct tax is calculated and collected completely on autopilot.
This automation is a massive win for your business for two reasons. First, it keeps you fully compliant with international trade laws so you never have to worry about legal penalties. Second, it completely protects your hard-earned profit margins. If you don’t calculate tax automatically, you might end up having to pay those international taxes out of your own pocket after the sale goes through, which completely destroys your margins. Geolocation takes that stress entirely off your plate, ensuring you collect the correct amount every single time. By setting this up, you are no longer just running a basic, limited local website. You are officially commanding a highly optimized, completely automated, and borderless international brand.
6 Protecting and Scaling Your Digital Empire
How do you secure your WooCommerce store from hackers and spam?
Building your online storefront is an incredible achievement, but as an elite entrepreneur, your job doesn’t stop at design. You must protect what you build. In the digital economy, your website security isn’t just about protecting your hard work, it is a sacred promise to safeguard your customers’ private data, build trust, and defend your revenue. If you leave your digital doors unlocked, you risk losing everything you have worked so hard for. Thankfully, locking down your store doesn’t require a massive cybersecurity budget. You can turn your website into an unbreachable fortress right now using a few brilliant, free strategies.
Form a Shield with Strong Passwords and Two-Factor Authentication
The absolute first line of defense begins with your login screen. Never, under any circumstances, use a predictable username like “admin” or a password that contains common personal details. Treat your password as the vault combination to your legacy. Use a long, randomized string of letters, numbers, and symbols. To take your defense to the next level, enable a free Two-Factor Authentication (2FA) plugin. This requires a unique code from your smartphone every single time someone tries to log in, making it virtually impossible for brute-force hackers to crack their way inside your dashboard.
Deploy a Free Security WordPress Plugin
Think of a security plugin as a twenty-four-seven security guard standing watch over your code. I highly recommend installing trusted, free industry shields like Wordfence Security or iThemes Security. Right out of the box, these tools deploy a powerful firewall that automatically blocks malicious bots, stops brute-force login attacks, and runs deep malware scans across your database. They also protect your comment sections and contact forms from being flooded with malicious marketing spam, keeping your site fast and clean for real buyers.
Establish an Automatic Backup Safety Net
If a major software update ever conflicts with an outdated script, or if a severe technical emergency occurs, you need an insurance policy. That policy is an automated backup. Never rely on manual backups that you might forget to run. Instead, pair Hostinger’s automatic daily backups with a dedicated WordPress backup tool like UpdraftPlus. This free tool allows you to schedule automatic backups that save your entire website structure, design, files, and customer orders directly to your secure cloud storage (like Google Drive or Dropbox). If anything ever goes wrong, you can restore your entire store to perfect operational health with a single click.
Can you use WooCommerce without a WordPress website?
Let’s address a massive point of confusion that causes a lot of early-stage entrepreneurs to completely stall out: No, you cannot use WooCommerce without a WordPress website.
It is completely natural to look at heavy platforms like Shopify and assume WooCommerce operates as its own standalone software service. But that is exactly where the hidden power of this ecosystem lies. WooCommerce is engineered specifically as an open-source plugin, which means it is designed to run exclusively on top of WordPress.
Think of WordPress as the ultimate, high-performance engine of your vehicle, and WooCommerce as the specialized transmission that converts that raw horsepower into a retail storefront. WordPress provides the content management system, the pages, the blog infrastructure, and the global settings. WooCommerce steps inside that framework and beautifully overlays your product data, shopping carts, checkout systems, and tax rules.
By running WooCommerce on top of WordPress, you win the ultimate crown in business: Total Ownership. You escape the strict corporate rules, rising monthly subscription bills, and restrictive limitations of closed platforms. You own the code, you own the store, and you own your future. Embrace the architecture, master the dashboard, and leverage this combination to build a brand that commands authority.